Hostinger is one of the most popular hosting providers. It is a reliable hosting service suitable for beginners and offers shared hosting plans at affordable prices. Additionally, its basic plan includes a free email and domain name for the first year. This guide explores the step-by-step process to easily make a WordPress website with Hostinger.
Points to Learn:
- How to check a domain name for any trademark infringement?
- Which of the Hostinger’s WordPress plans to purchase based on your website’s needs?
- How to claim a free domain name with a Hostinger plan?
- How to create and customize your website?
- How to secure and optimize your website using plugins?
- How to make your website responsive for tablet and mobile devices?
1. Brainstorm Domain Name Ideas
What is a domain name?
The domain name is the name of a website plus the extension that visitors type into the search bar to reach a website. For instance, the domain name for the company Apple is “apple.com.” In this example, “apple” is the name and “.com” is the extension. Together, they form a domain name. Apart from the “.com” extension, there are a variety of other extensions that websites use in their domain names, such as:
- .”net”: suitable for tech companies.
- “.org”: suitable for non-profit organizations, open-source projects, and communities.
- “.edu”: suitable for educational websites.
- “.gov”: suitable for government websites.
- “.biz”: suitable for business websites.
- “.info”: suitable for information sharing websites.
- “.tv”: suitable for video streaming websites.
- “.store”: suitable for e-commerce stores.
- Location-specific extensions, such as “.ca” for Canada, “.uk” for the UK, and “.eu” for the European Union suitable for serving a specific country or region.
Does the Domain Extension Matter?
Yes, the domain extension matters to some extent. It is worth noting here that the “.com” extension is the most popular domain extension. It is generally suitable for any type of website, unless it is a government website. A website with the “.com” extension is easy to recall and looks more credible. The domain names with the “.com” extension are trusted more because it is the oldest and most widely used extension, and people have now become used to it. Without a doubt, it is the most widely recognized extension with a high trust score. Therefore, you should aim for the “.com” extension unless you have a specific need to convey the nature or location of your business.
Choosing a Domain Name
The first step to creating a WordPress website with any hosting platform is to come up with a suitable domain name. The domain name is the address visitors use to reach a website. You can utilize tools, such as, Hostinger domain name generator, to assist you in this process. The Hostinger domain name generator helps with the following:
- Confirms if a domain name is available or not.
- Suggest similar names in relation to the unavailable domain names.
- Generate domain name ideas based on text prompts using AI.
In some cases, you can find an unavailable domain name for sale at various auction sites where you can purchase it. However, you will have to pay a premium for these domain names.
It is worth noting that this step requires effort and time because the internet is an old space now and many desirable domain names are already taken. You have to be really creative to come up with a relevant domain name for your website.
A creative and catchy website name can do a little bit of marketing for your business right from the beginning. For instance, there is a famous travel blog named “Anywhere We Roam.” The title exquisitely conveys the idea that the blog is about travel in a casual tone. Coming up with a unique and creative domain name idea is a good marketing strategy. You can also take assistance from online domain name generators for domain name ideas.
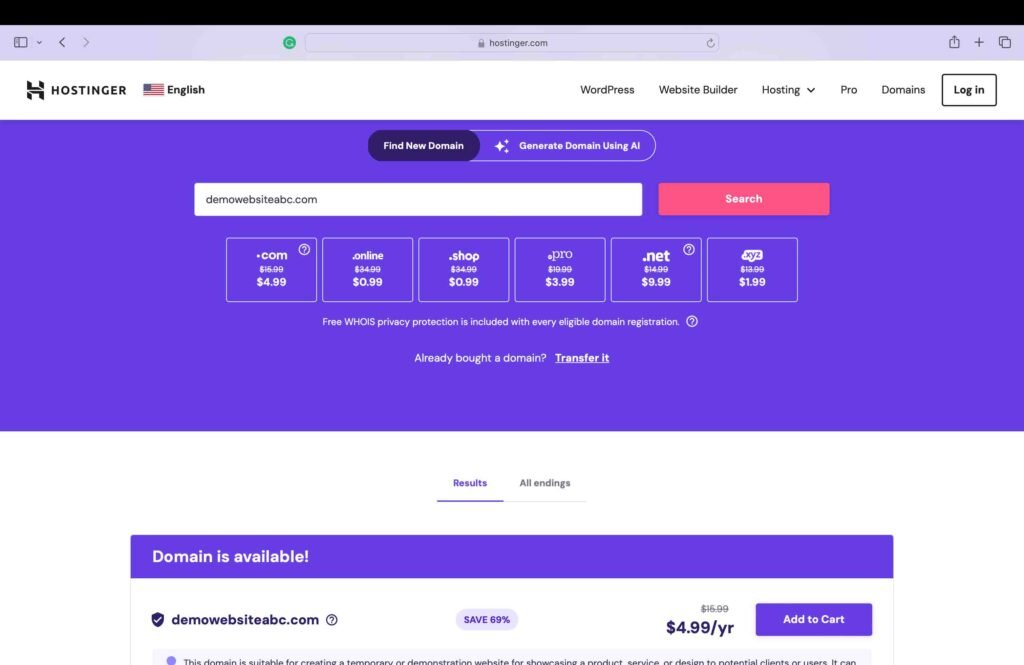
As you can see in the below screenshot, when the domain name “demowebsiteabc.com” was searched in the Hostinger domain name generator, it was shown as available.
2. Check for any Trademark Infringements
Even if a domain name is available, that does not mean it is free to use. You should always check the trademark database, both domestically and internationally, to make sure that your domain name is not already trademarked by any business. You should perform the following steps to thoroughly check for any trademark infringement:
A. Domestic Trademark Search
- Search the official trademark database of your country to check for any trademark infringements.
- For instance, the official trademark website for the US is UPSTO. If you are located in the US, you should look up domestic trademark records in UPSTO to make sure that the domain name is safe to use in your home country.
B. International Trademark Search
- Perform a search in the Global Brand Database of the WIPO, which provides an international trademark database across multiple countries.
It is advisable to stay away from trademarked names to avoid any legal challenges in the future.
3. Purchase a Web Hosting Plan
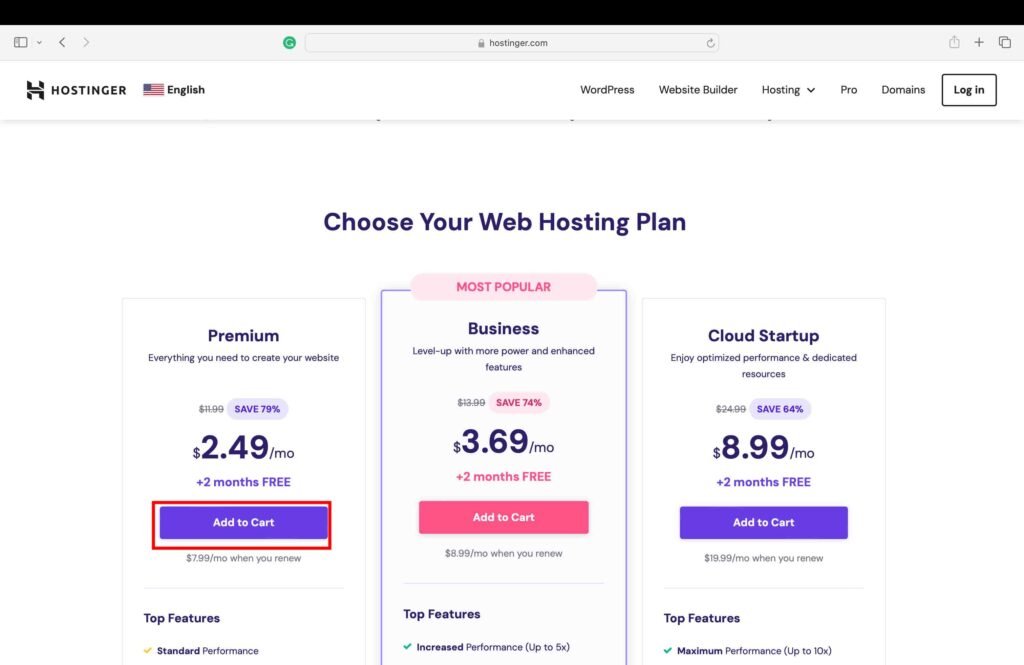
Hostinger offers three plans:
- Premium Plan: Suitable for new and basic websites with minimal storage requirements.
- Business Plan: Offers additional storage, e-commerce features, and website optimization features over and above the premium plan. Suitable for growing websites and small e-commerce stores.
- Cloud Startup Plan: Offers a dedicated IP address and advanced e-commerce features. Suitable for established, high-traffic, and resource-heavy websites.
You should opt for a plan that best meets your website’s needs. If you are just starting out with a new website, you can opt for the Business Plan over the basic Premium Plan since it offers additional storage space and website optimization features at a nominal increase of $1 in the monthly premium.
For the purpose of this tutorial, the Hostinger premium plan was purchased.
- Click the “Add to Cart” button on the preferred plan.
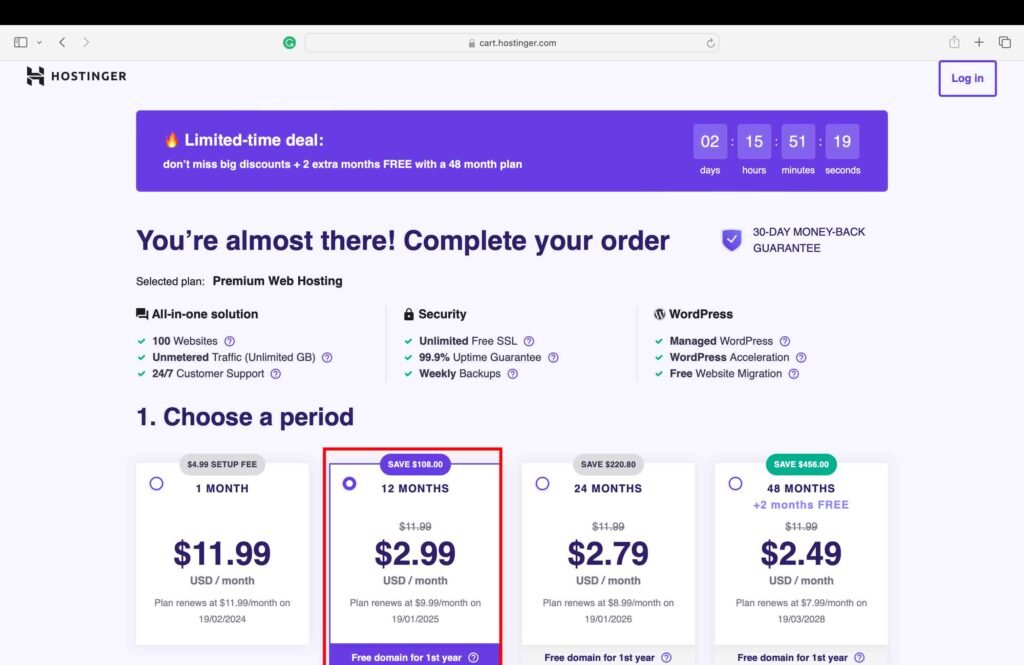
- Choose a period for the plan.
- Create an account using Google or Facebook.
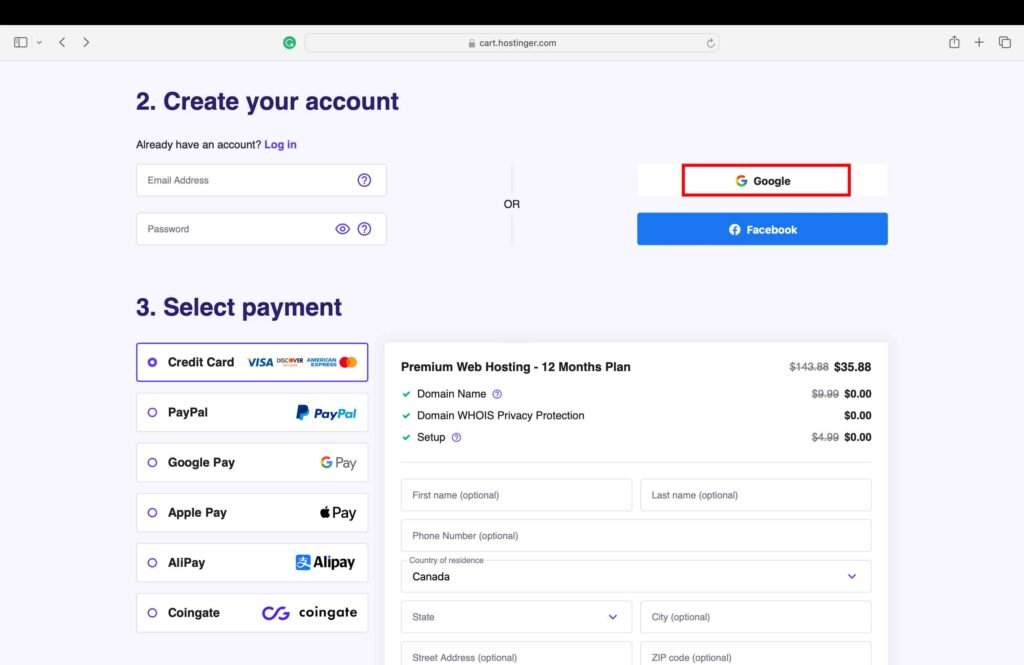
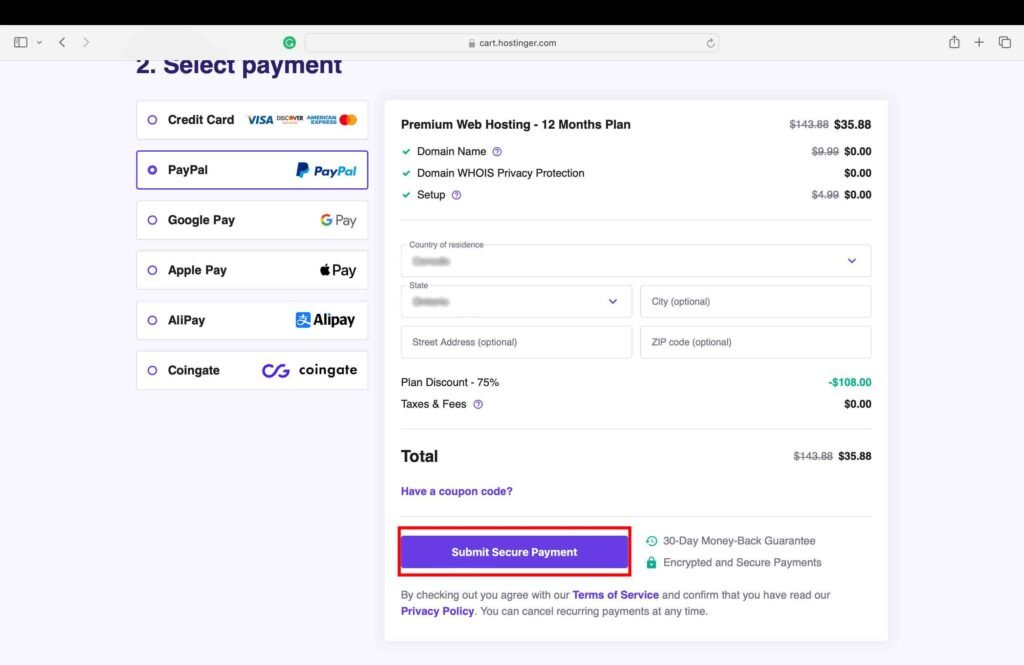
- Click on the preferred payment method and submit the payment. Hostinger provides a variety of payment options to choose from, such as credit cards, PayPal, Google Pay, Apple Pay, and more.
4. Build the WordPress Website
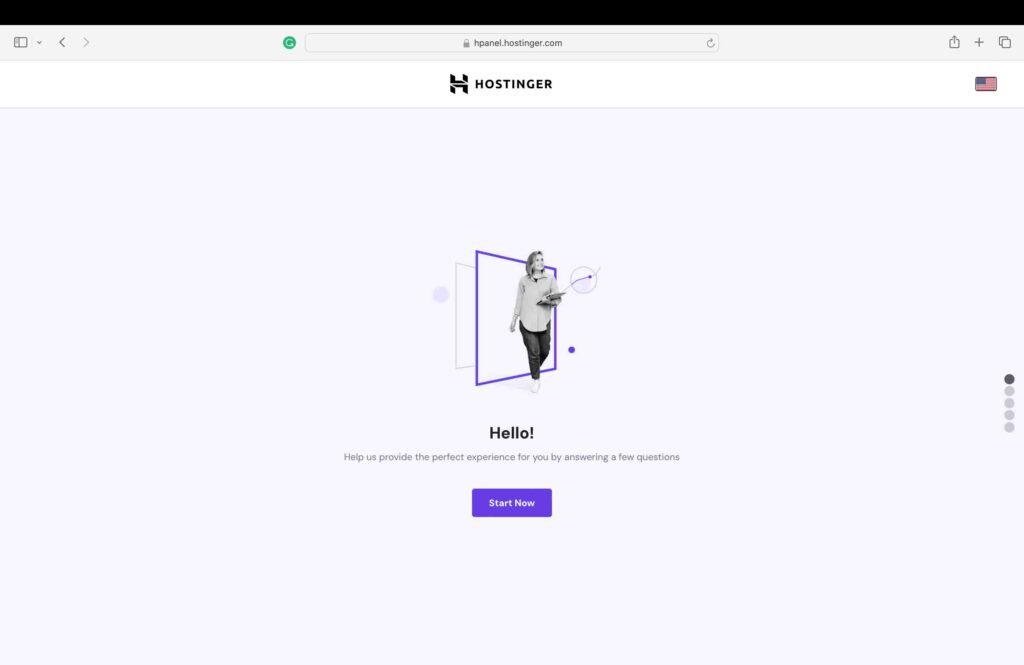
Once you make the payment, you are redirected to the “Start Now” page.
- Click the “Start Now” button to proceed.
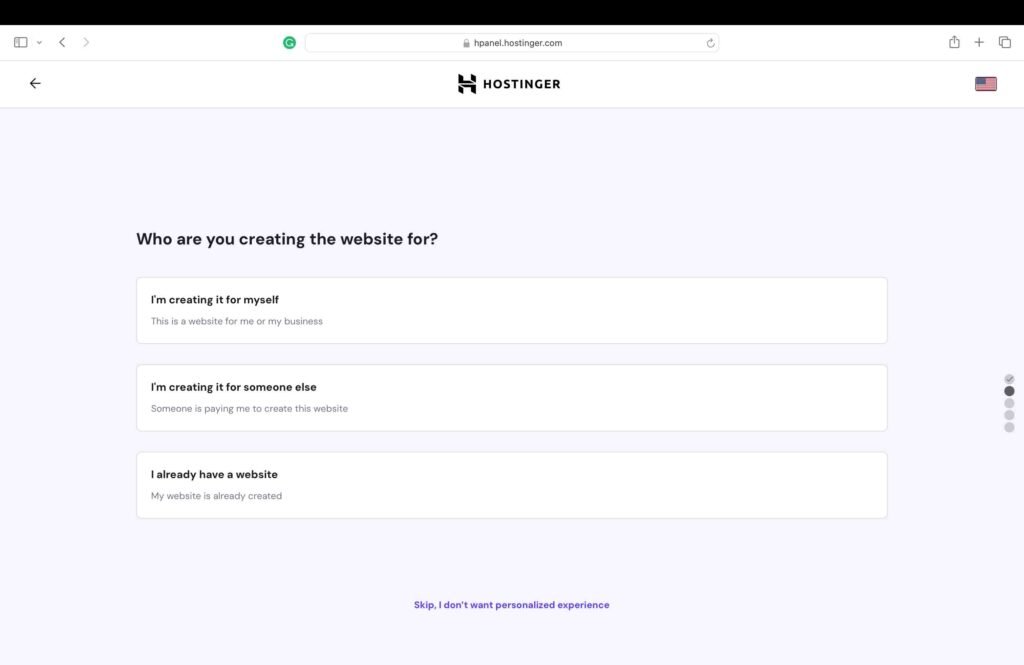
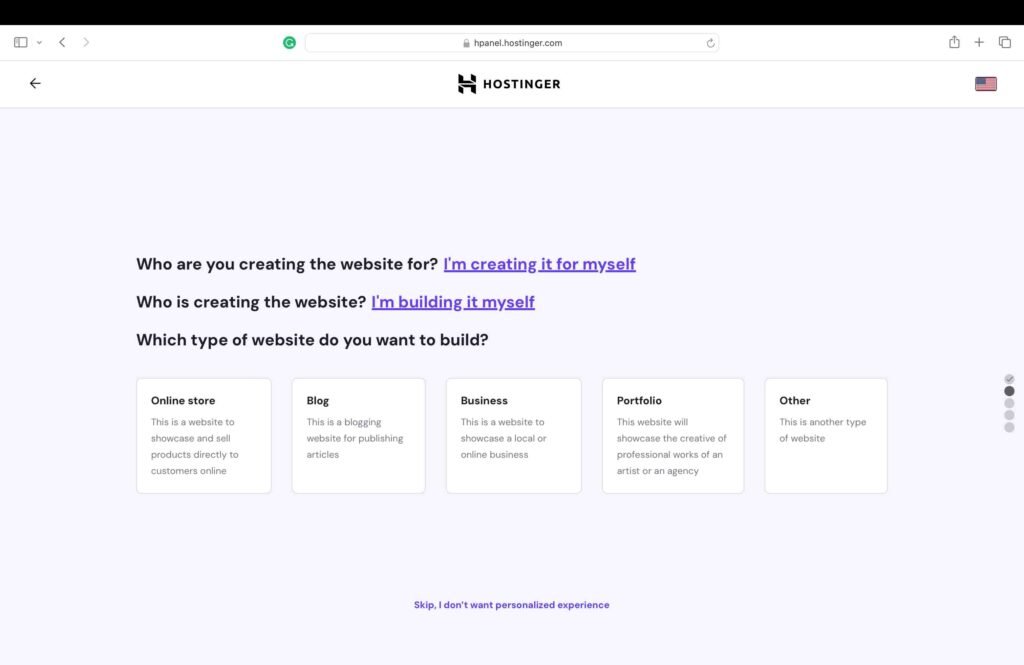
- Click the appropriate option relating to the website owner.
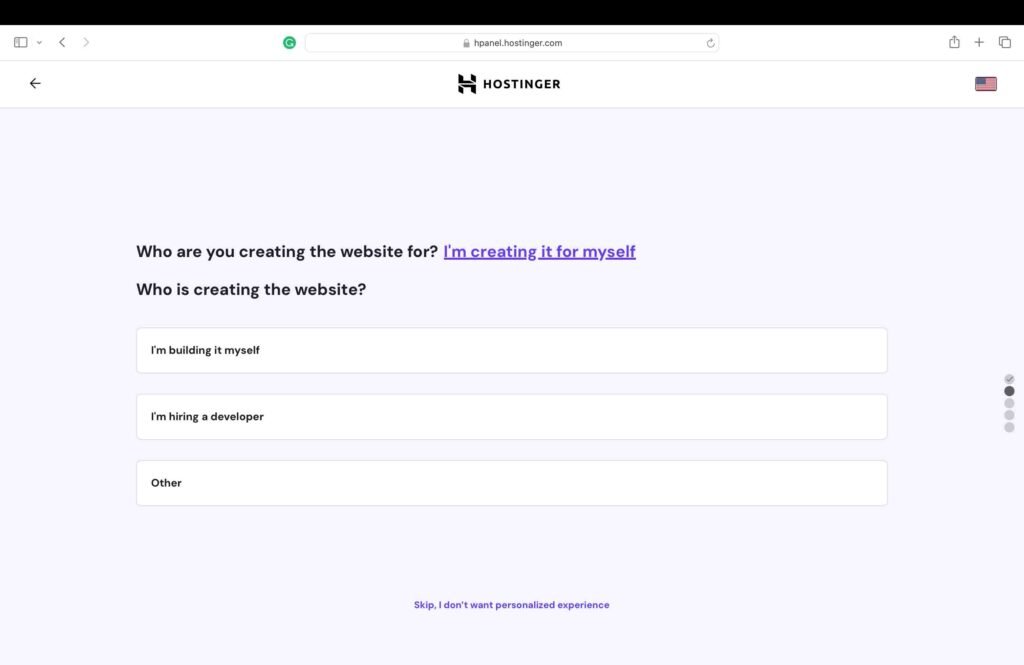
- Click the option “I’m building it myself”.
- The next question relates to the type of website being created. Click the appropriate option to move on to the next step.
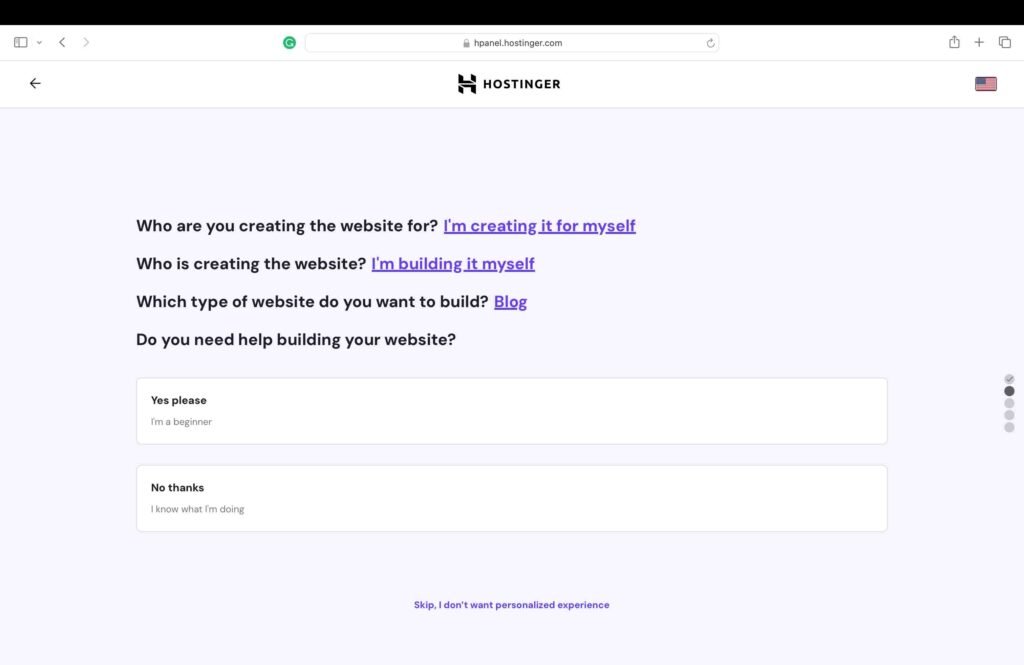
- The next question relates to website assistance. Check the option “No thanks.”
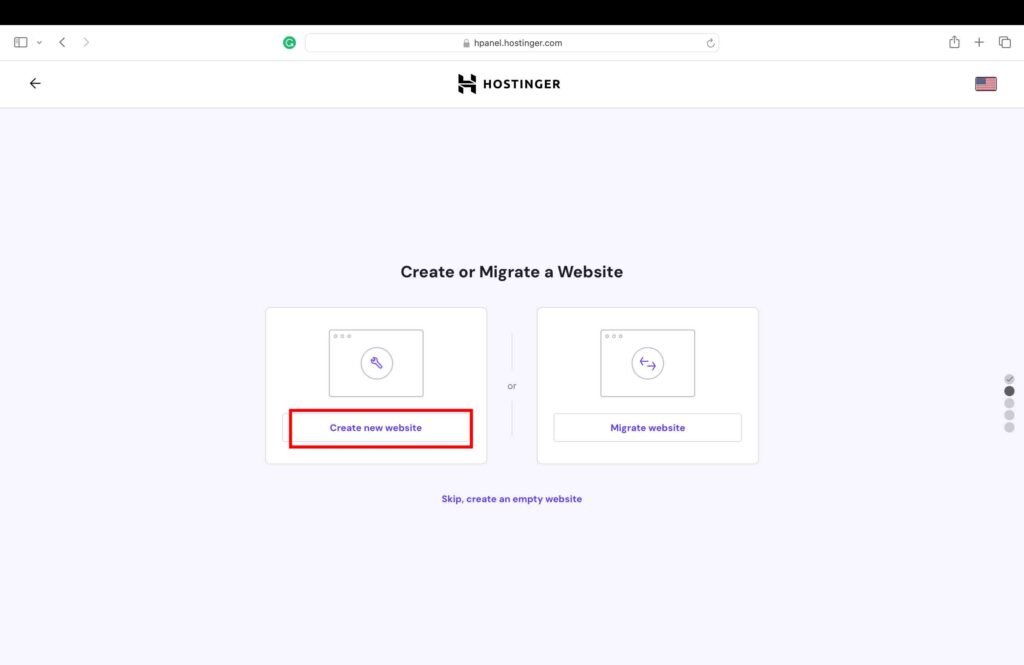
- The next screen presents two options: create a new website or migrate a website. Click the “Create new website” button.
5. Set the Login Details
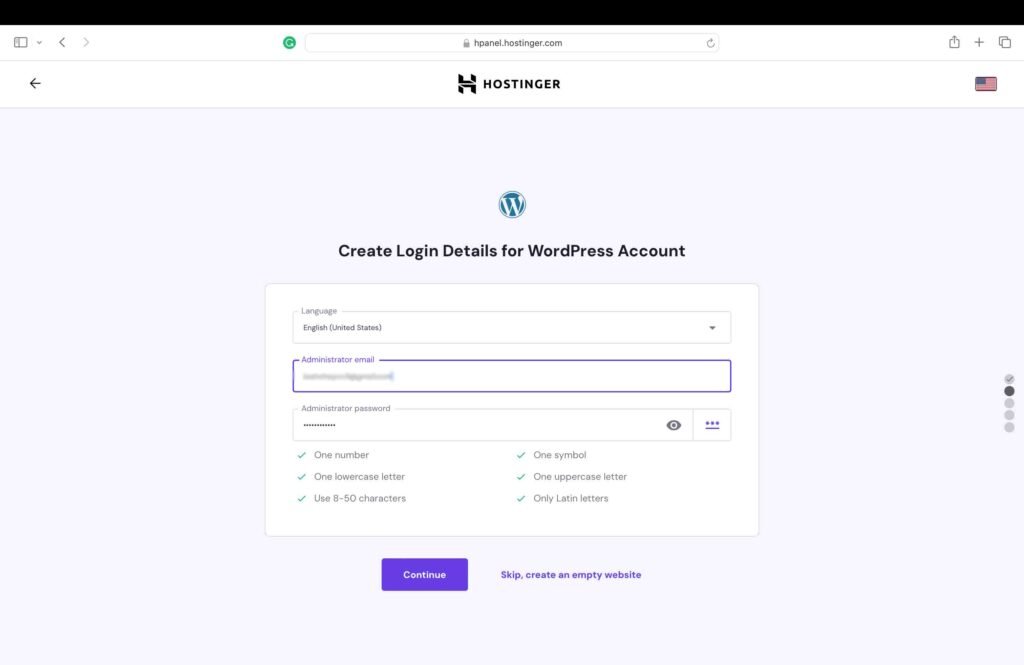
The next screen will prompt you to set your WordPress login details, i.e., the email and password. Choose a strong password as per the requirements stated below the password bar.
- Click the “Continue” button to move forward.
6. Skip Plugin Recommendations
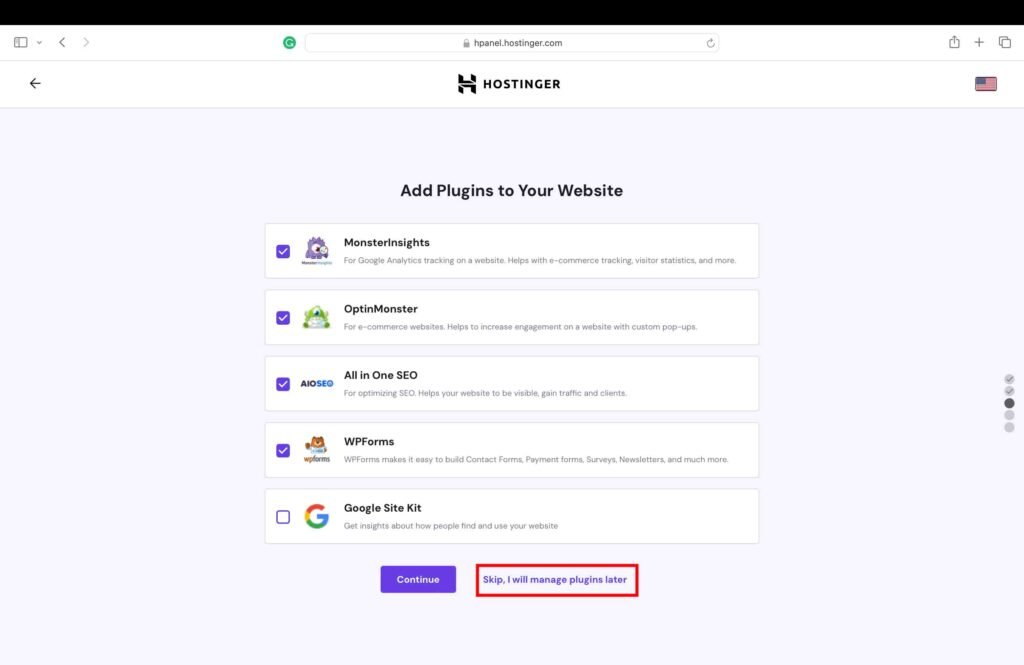
- The next screen will recommend installing some popular plugins. You can install these plugins later on based on your needs. Therefore, click the “Skip, I will manage plugins later” button to proceed.
7. Install the Astra Theme
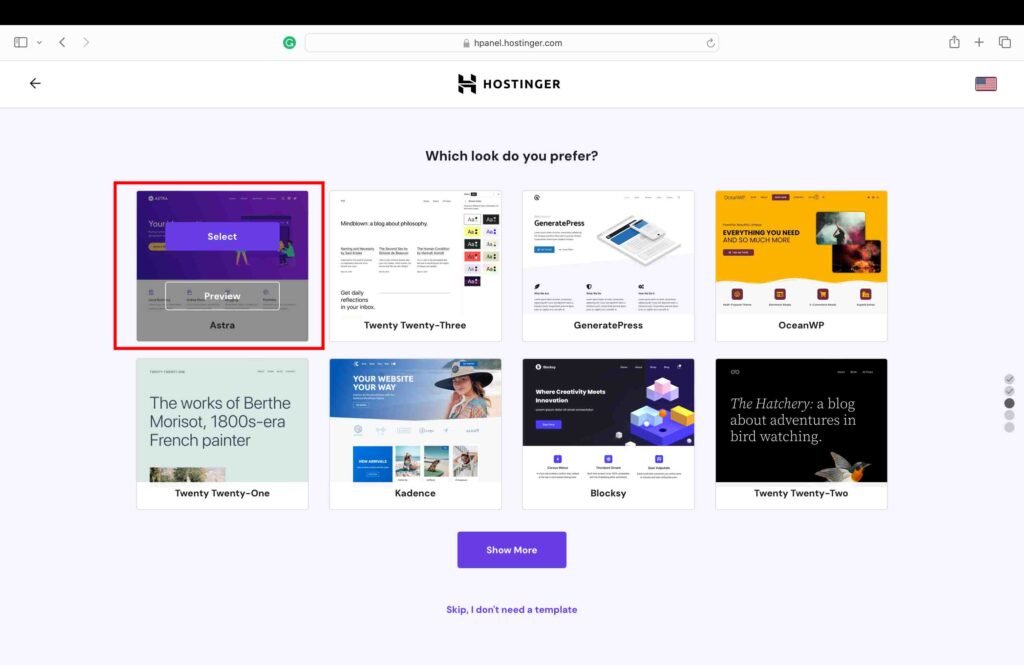
The next screen will suggest some popular themes. The Astra theme is one of the most popular choices for building a website. Additionally, it is also a safe choice because it is frequently updated.
- Hover over the Astra theme to select it.
8. Claim a Free Domain Name
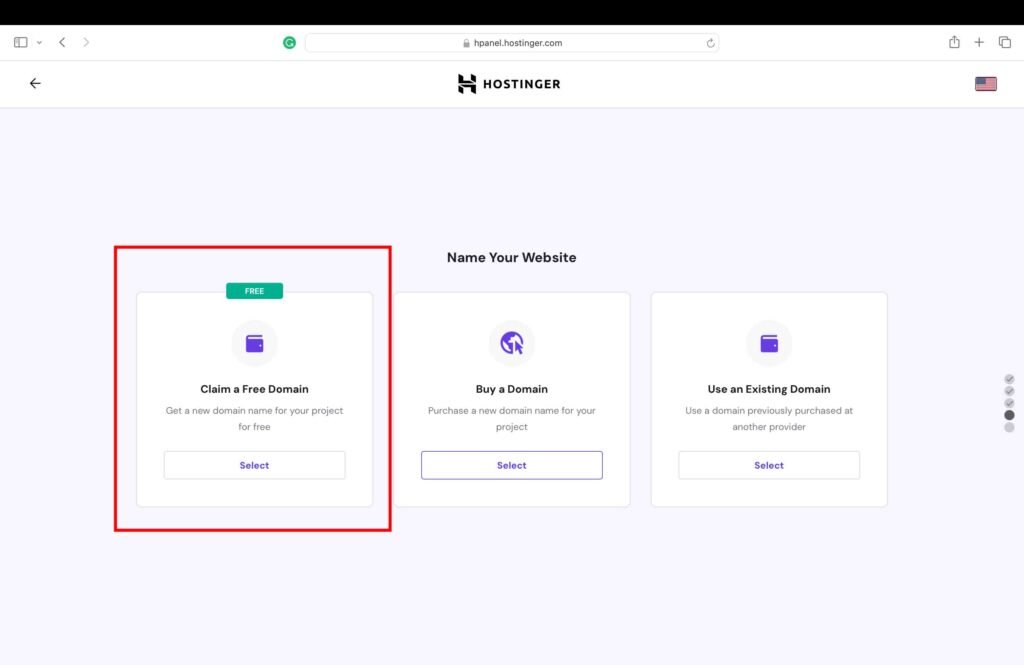
Hostinger offers a free domain for one year on all plans.
- Select the “Claim a Free Domain” option.
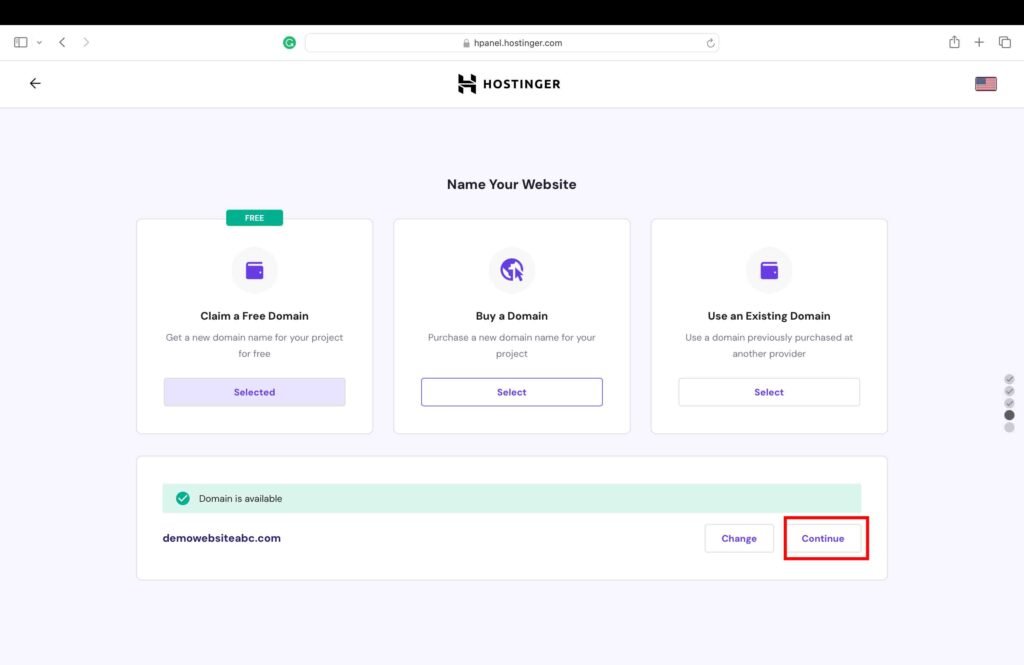
- Once you select the free domain name option, a search bar pops up at the bottom of the screen, where you can enter your desired domain name. If the domain name is available, you can click the “Continue” button to move on to the next step.
9. Complete the Domain Registration
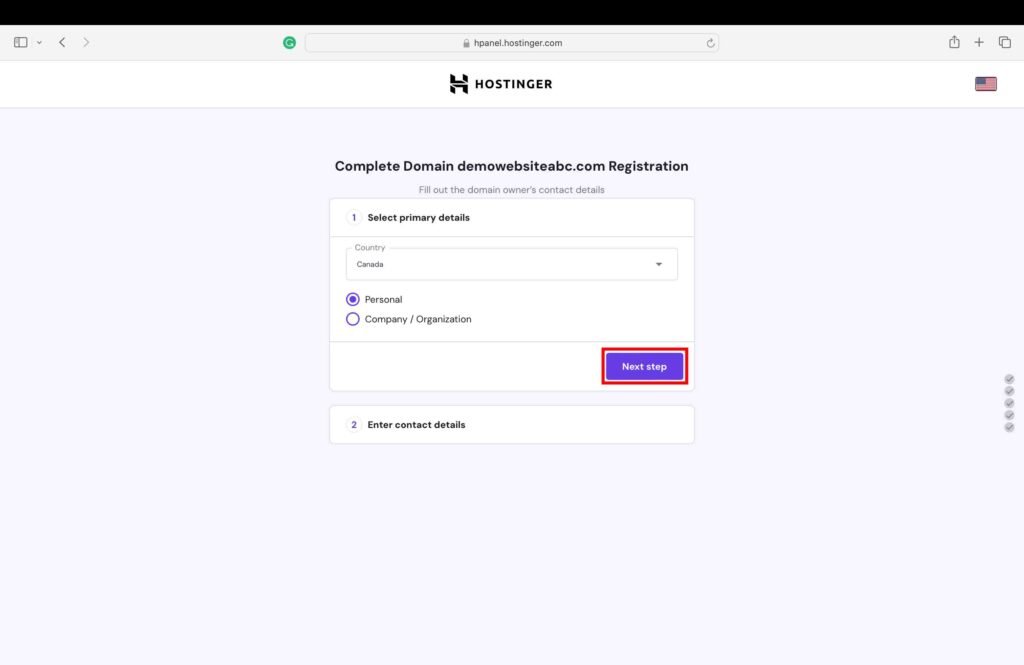
On the next screen, select the primary details about your website:
- The location
- Whether it is a personal or business website.
- Once selected, click the “Continue” button.
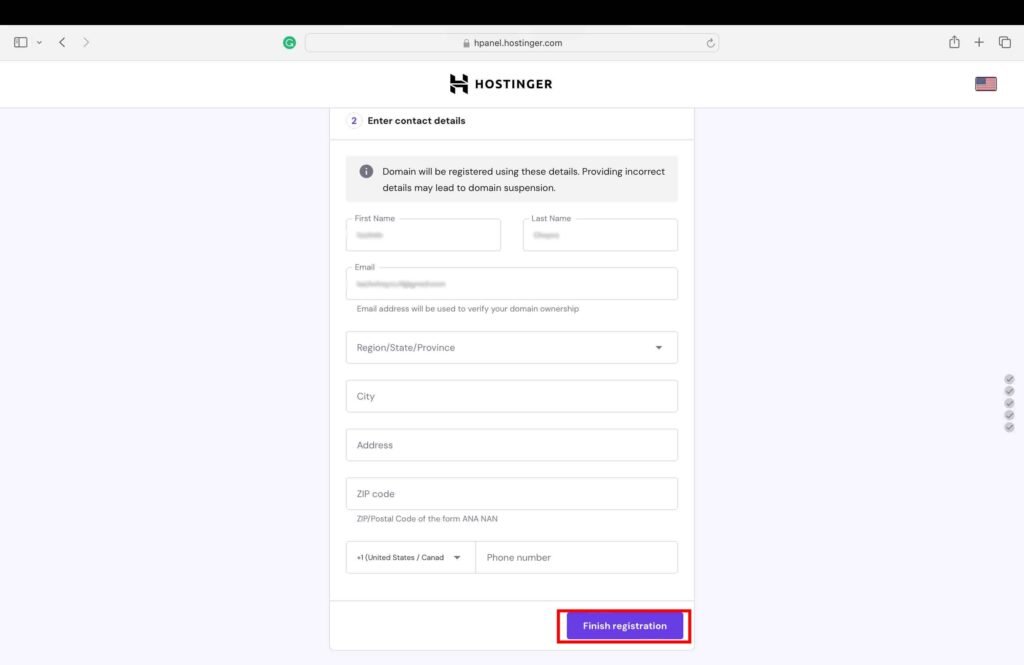
- The next step is to enter the contact details. These details are required for the domain registration. Once you have entered all the details, click the “Finish registration” button.
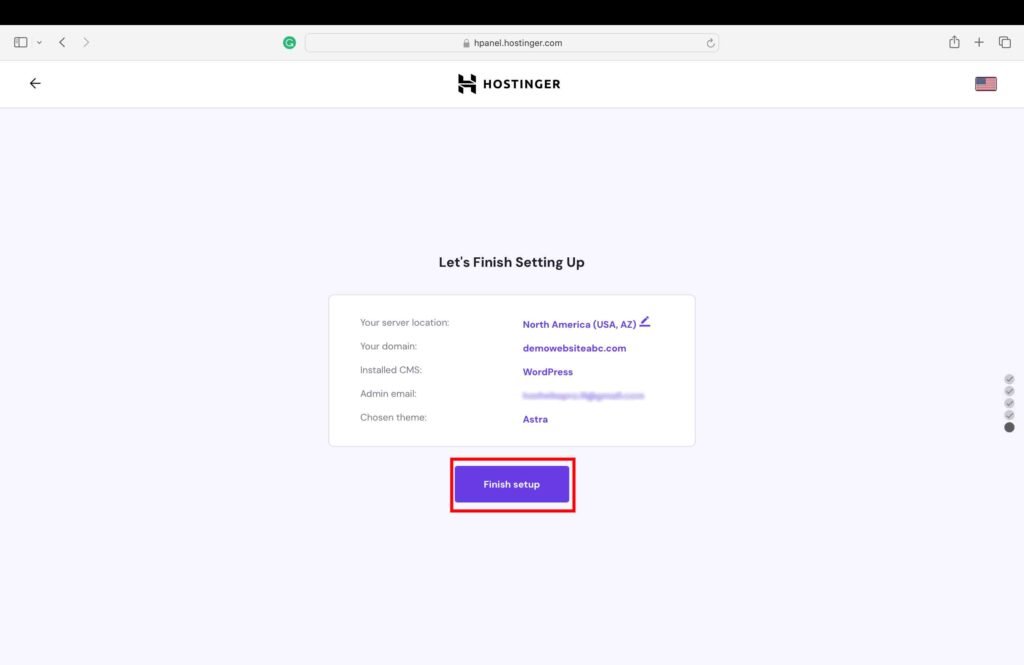
- The next screen will show the details of the domain name registration. Verify the details, and click the “Finish setup” button.
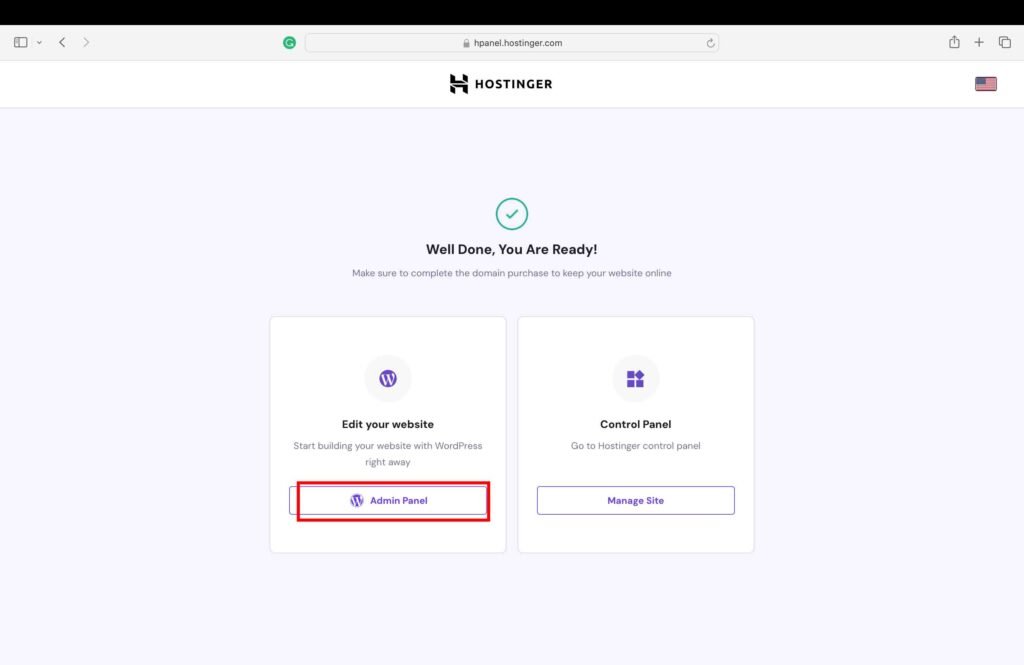
- After the domain registration has been completed, the next screen will show the option to visit the admin panel. Click the “Admin Panel” button to visit the website.
10. Update the Website Address to HTTPS
The next step is to change the website address from HTTP to HTTPS. This is a very important step to make your WordPress website safe and secure.
- Click the Users tab.
- Click the Profile tab.
- Update the http to https in the website address.
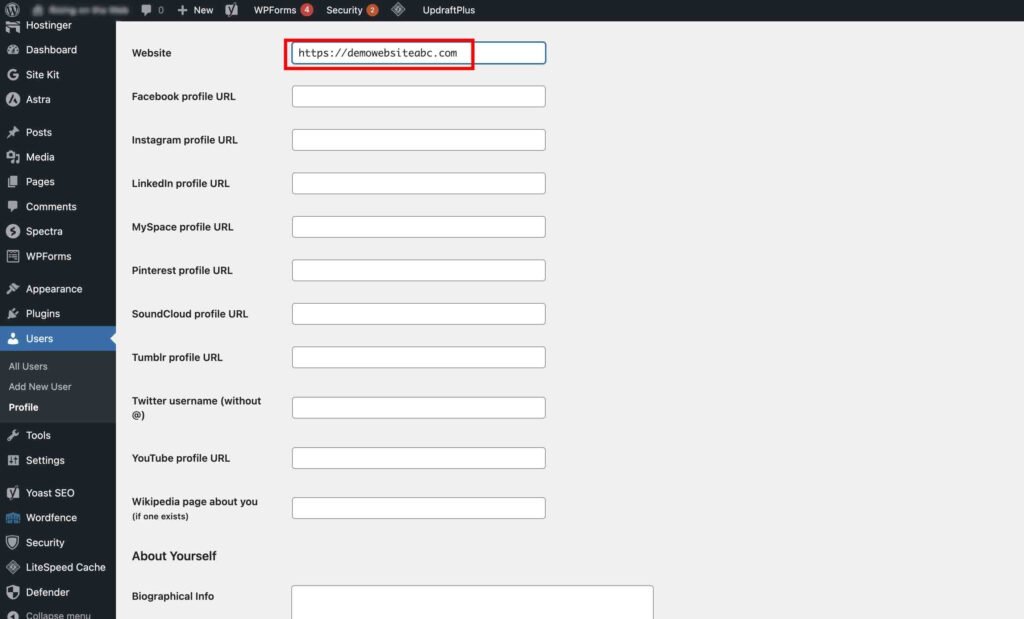
Once you update the address in the website section, perform the following steps:
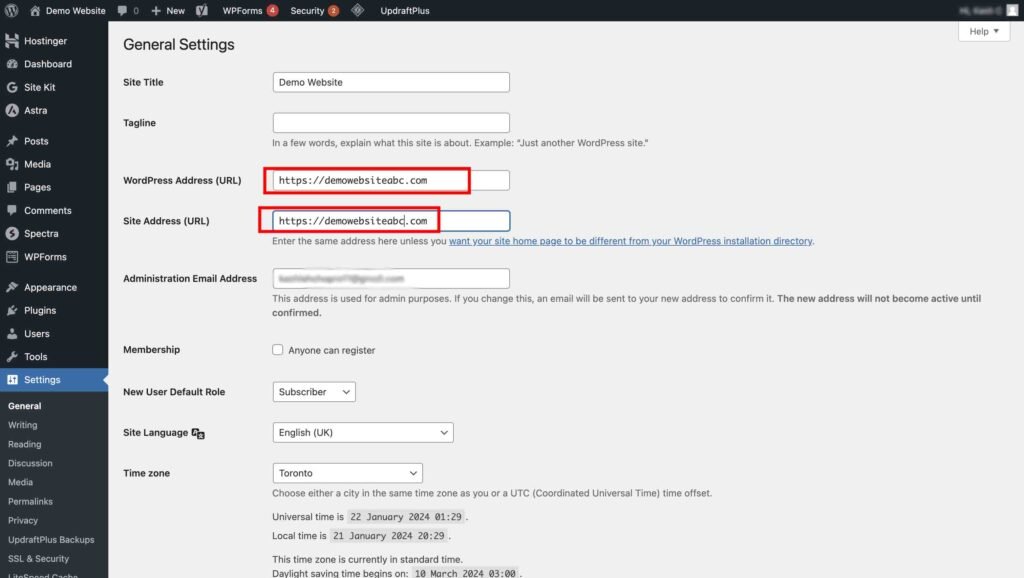
- Click the “Settings” tab.
- Click on General.
- Update the website address to “https” in both the “WordPress Address” and “Site Address” fields.
- Update the time zone to reflect your region.
11. Set the Permalink Structure to “Post Name”
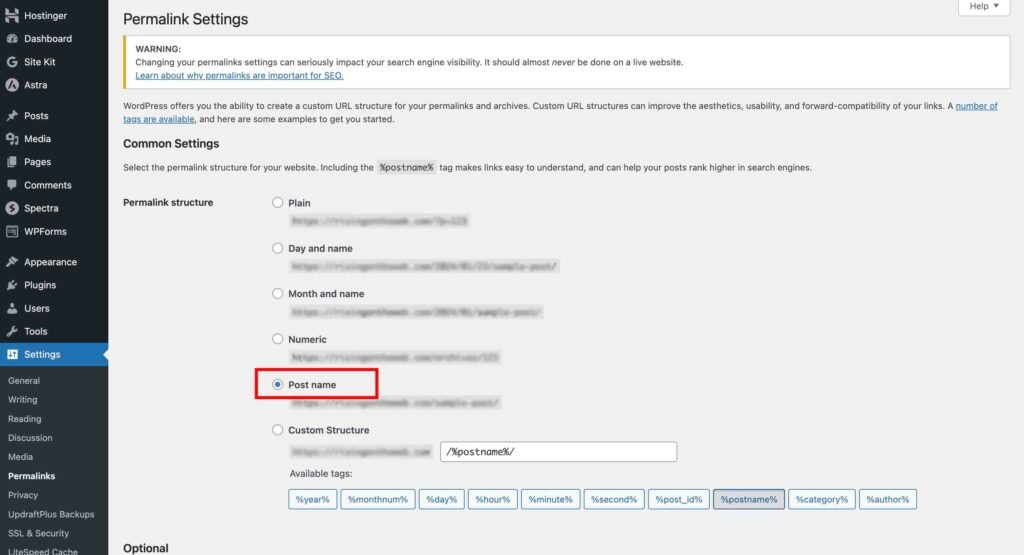
- Click the settings tab on the dashboard.
- Click on Permalinks.
- Set the permalink structure to “Post name.” This structure is ideal from an SEO standpoint. You can read more about this at Best WordPress Permalink Structure for SEO.
12. Install the Starter Templates
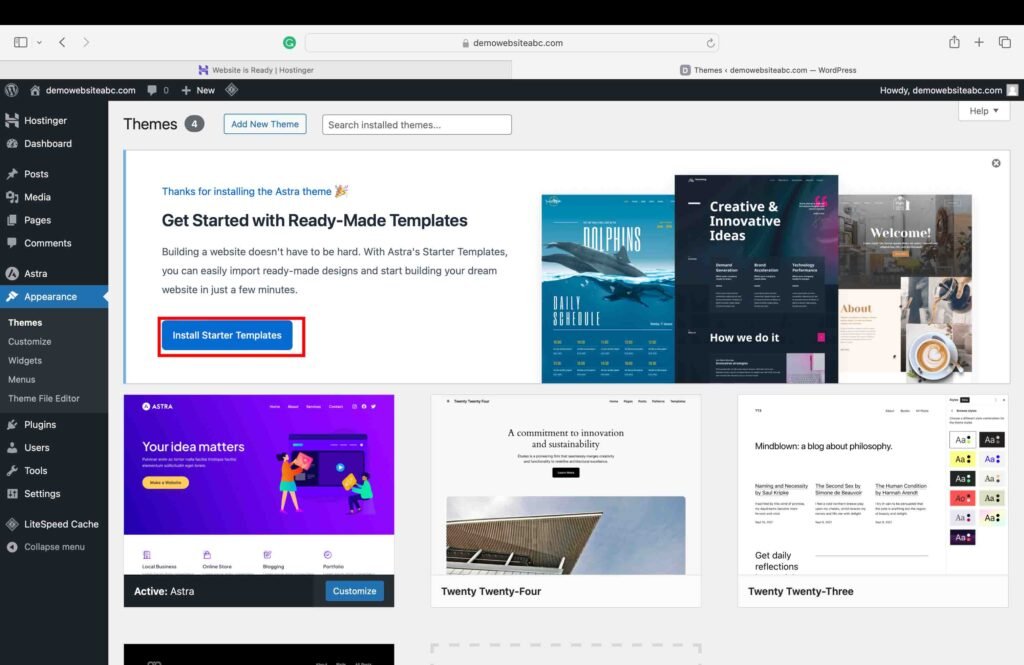
- Go to the “Appearance” tab.
- Generally, whenever you install the Astra theme, you will find a banner at the top of the themes page for installing the starter templates.
- If you do not see this banner, you can always click the “Add New Plugin” button at the top of the themes page and search for the “Starter Templates” plugin to install it.
13. Build the Website
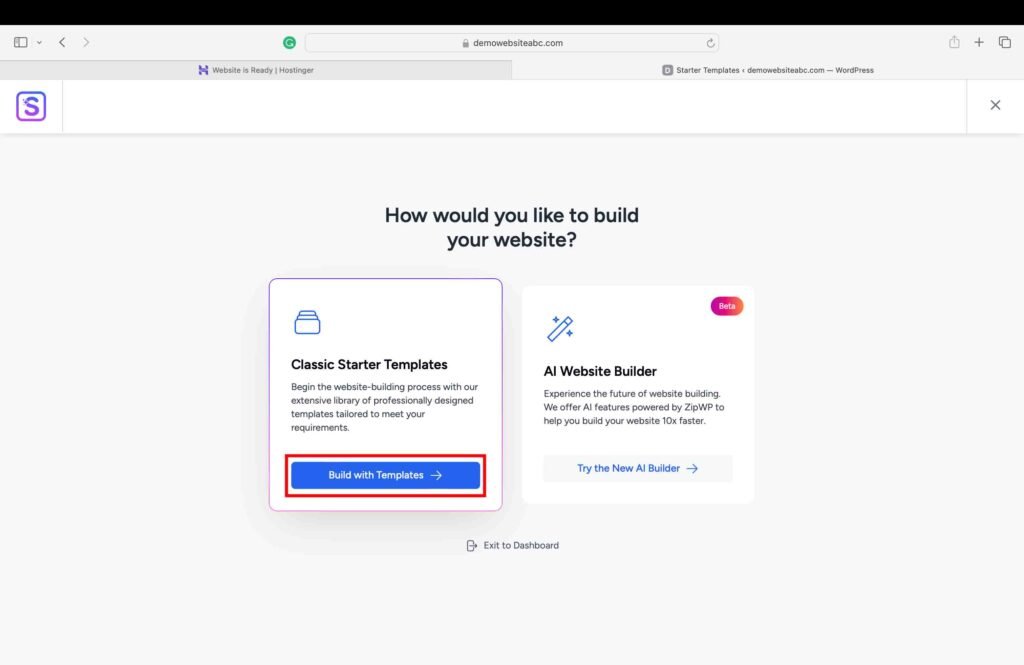
After the starter templates have been installed, you will be redirected to a page that presents two options to build your website, i.e., Classic Starter Templates and AI Website Builder. We will opt for the Classic Starter templates because it is comparatively easy to build a website with ready-to-use templates that can be tailored with minimal effort to meet your website’s needs.
- Click the “Build with templates” option.
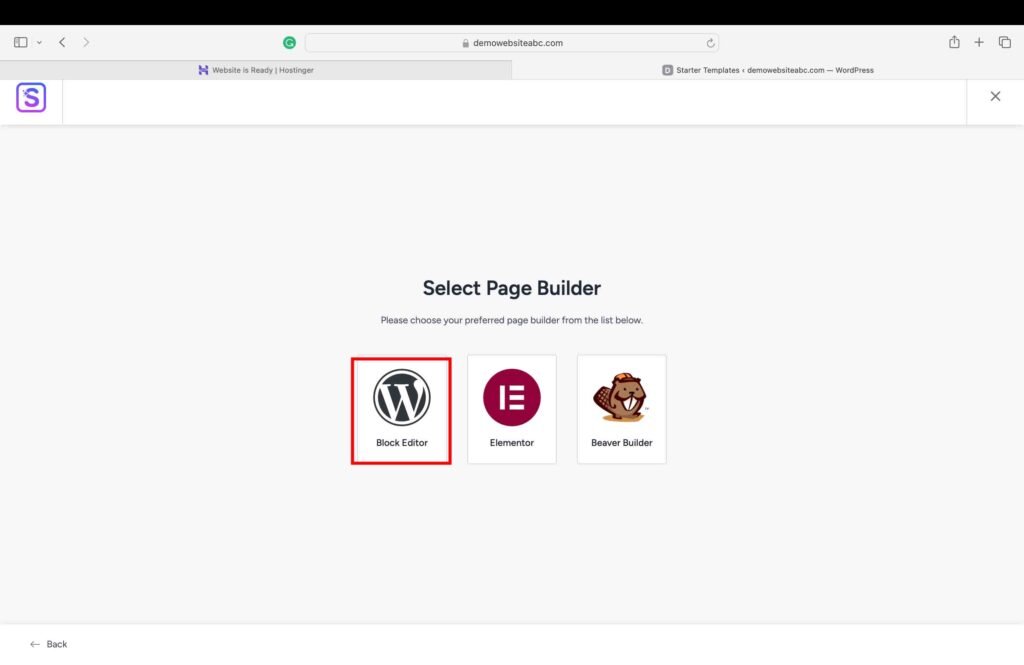
The next screen will present three page builder options.
- Click the “WordPress Block Editor” option to build the website.
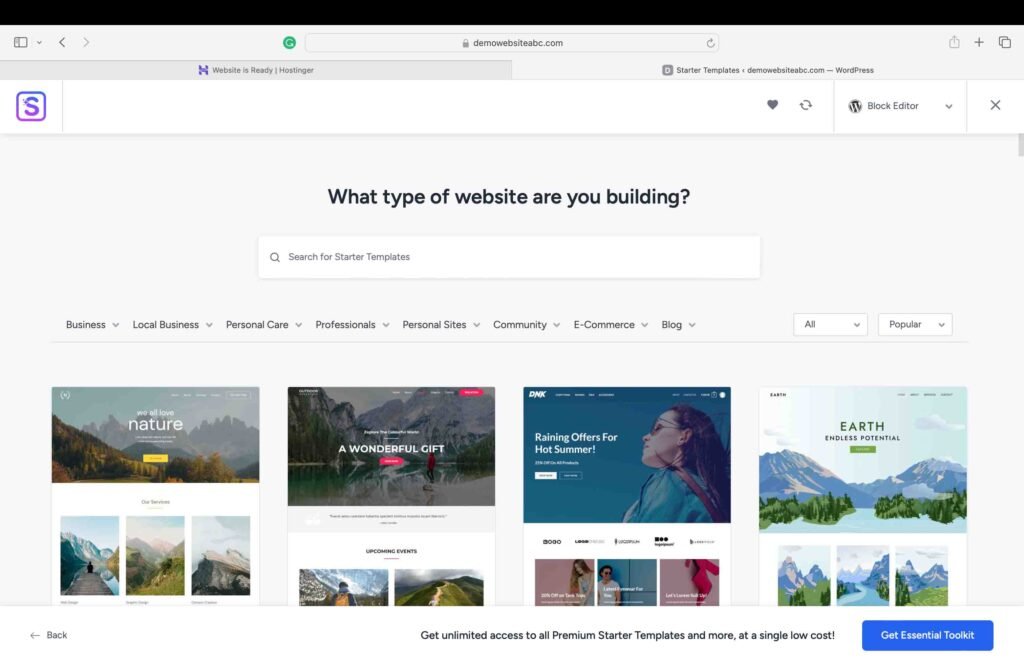
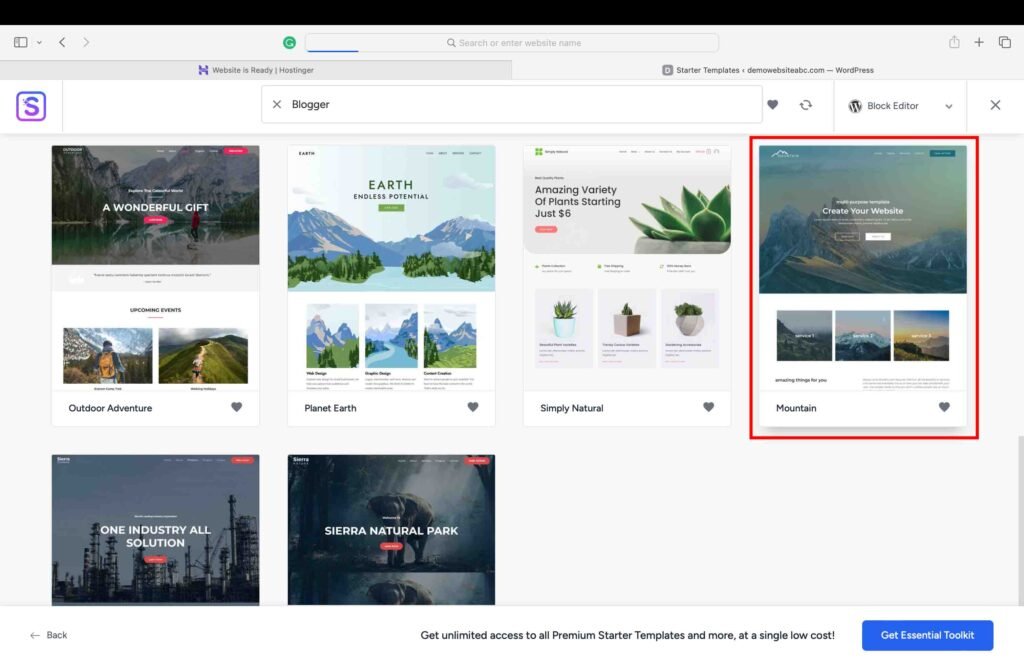
Once you select the block editor, you will enter the “Starter Templates” library. The template library offers a wide range of templates for different types of websites, such as business, personal care, professionals, personal sites, community, e-commerce, and blogs. It offers both free and paid templates. There are a variety of filters in the library that you can apply to search for the relevant templates. For the purpose of this tutorial, the free template “Mountain” was chosen.
- Click on the desired template.
14. Customize the Template
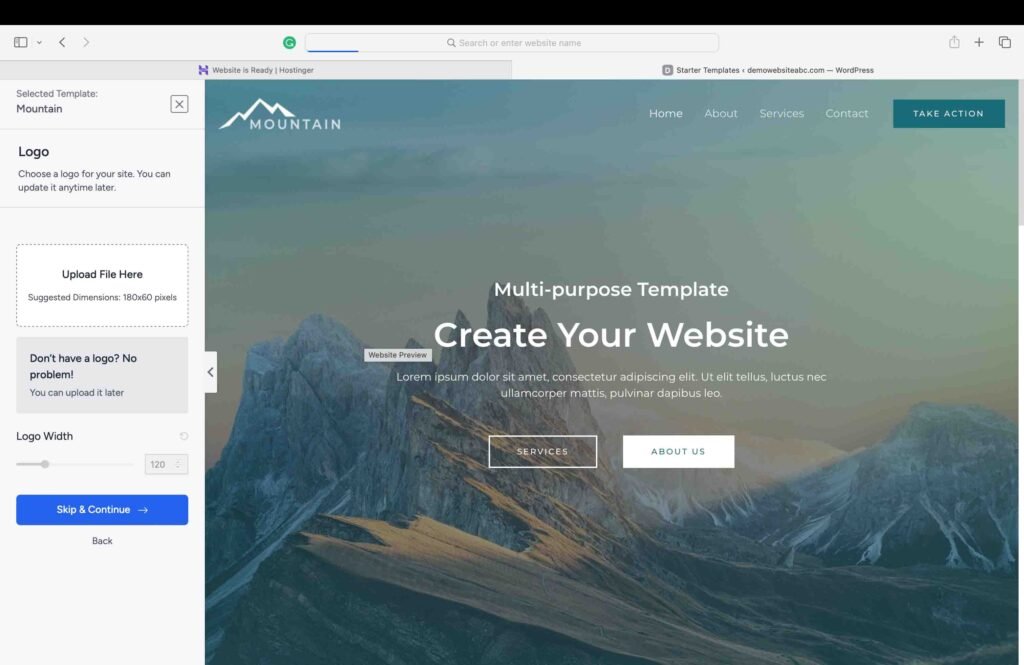
Once you select the desired template, you are redirected to the customization pages.
- Upload your website logo, if any. If you don’t have a logo, you can skip this step and delete the default logo image later on using the “Customize” tool.
- Click the “Continue” button to move forward.
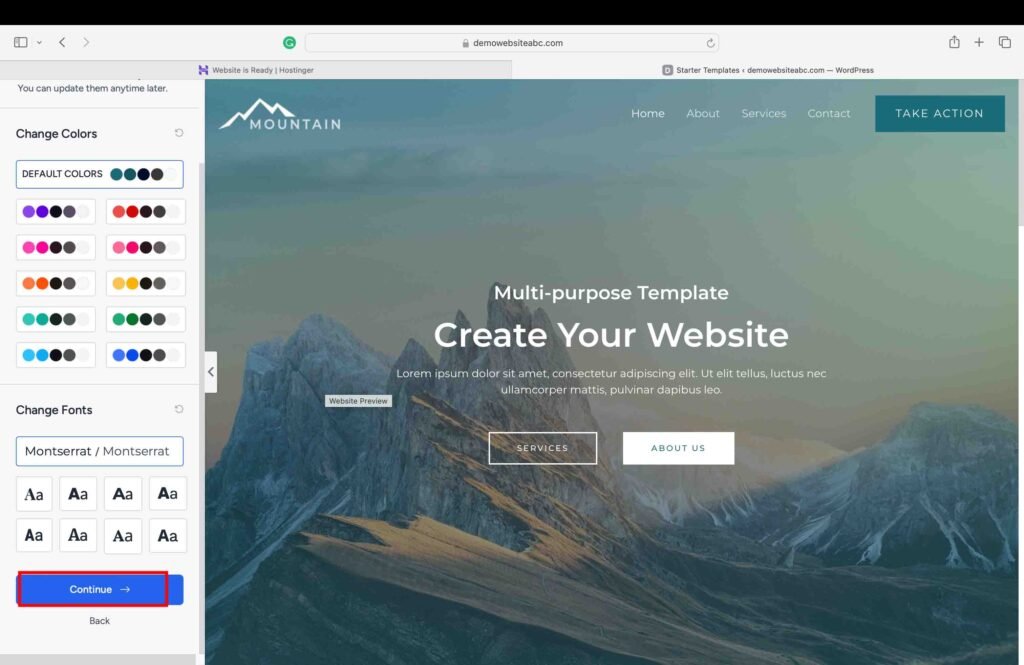
On the next screen:
- Choose the default colors and fonts for your website.
- Click the “Continue” button to move forward.
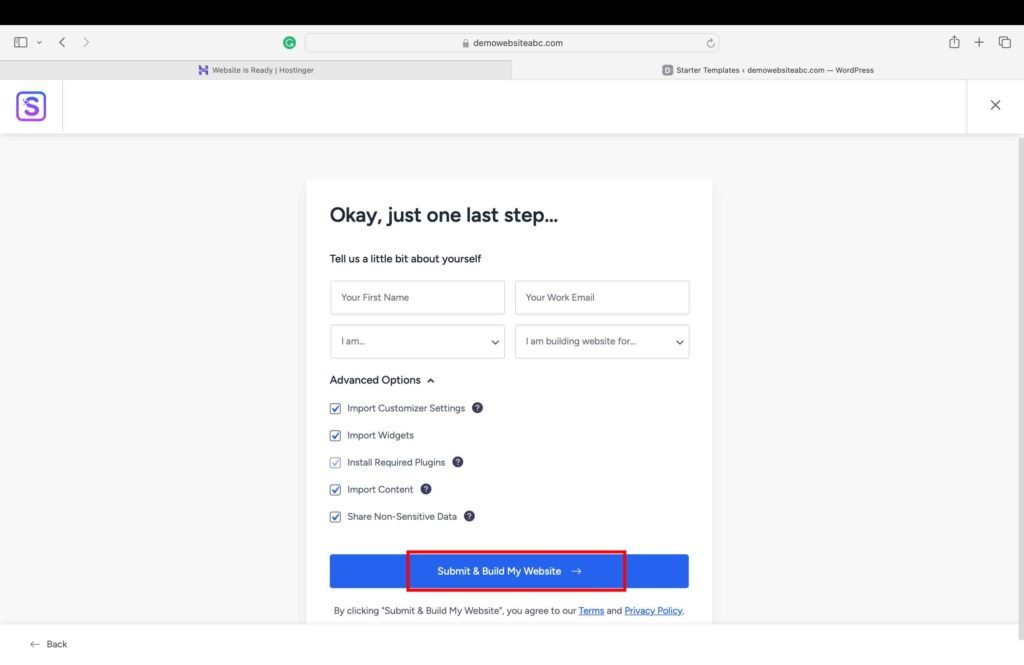
On the next screen, you can submit your website. All the advanced options are checked by default. However, make sure that the first four advanced options are checked in any case. The last option relating to sharing non-sensitive website data is optional and depends on your personal choice.
- Click the “Submit and Build My Website” button.
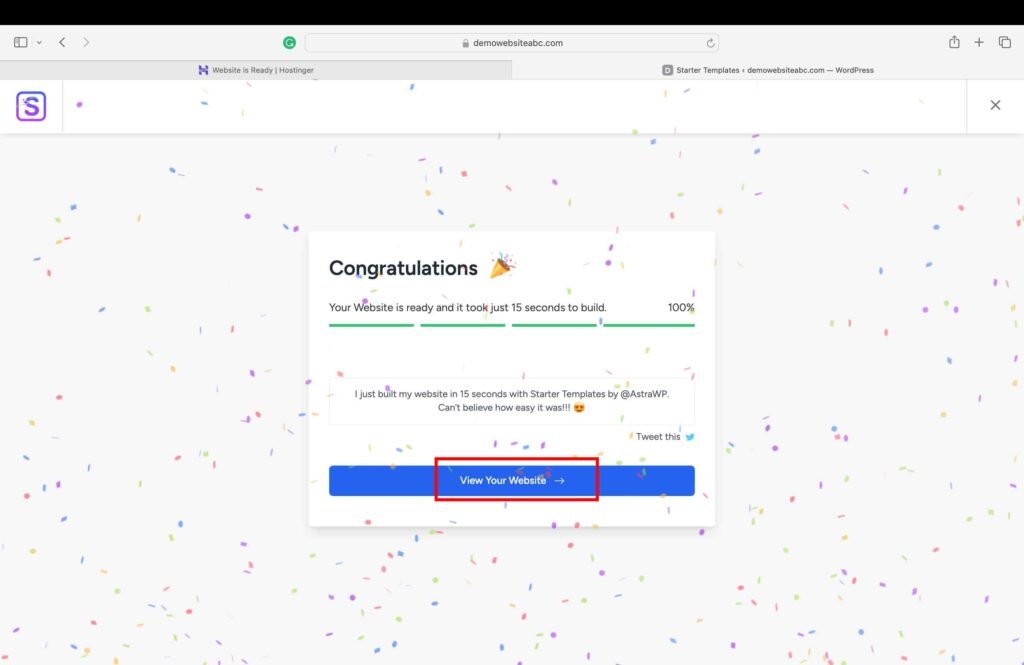
It usually takes a few seconds for a website to be ready.
- Click the “View Your Website” button to view the website.
15. Tailor the Website
You only need two tools to tailor your website:
- Customize tool
- Edit Page tool
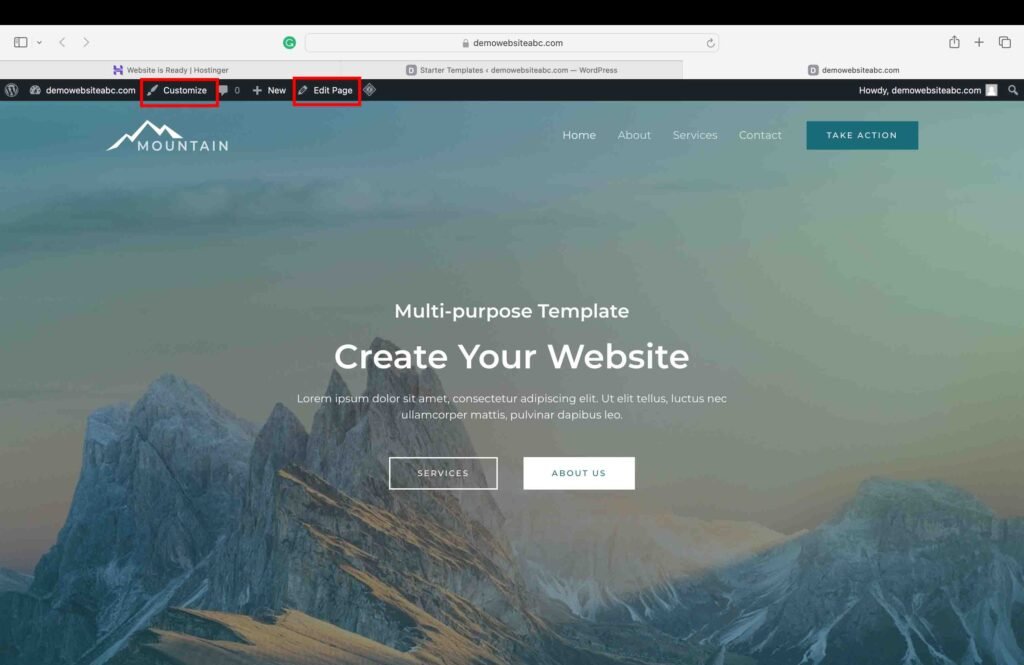
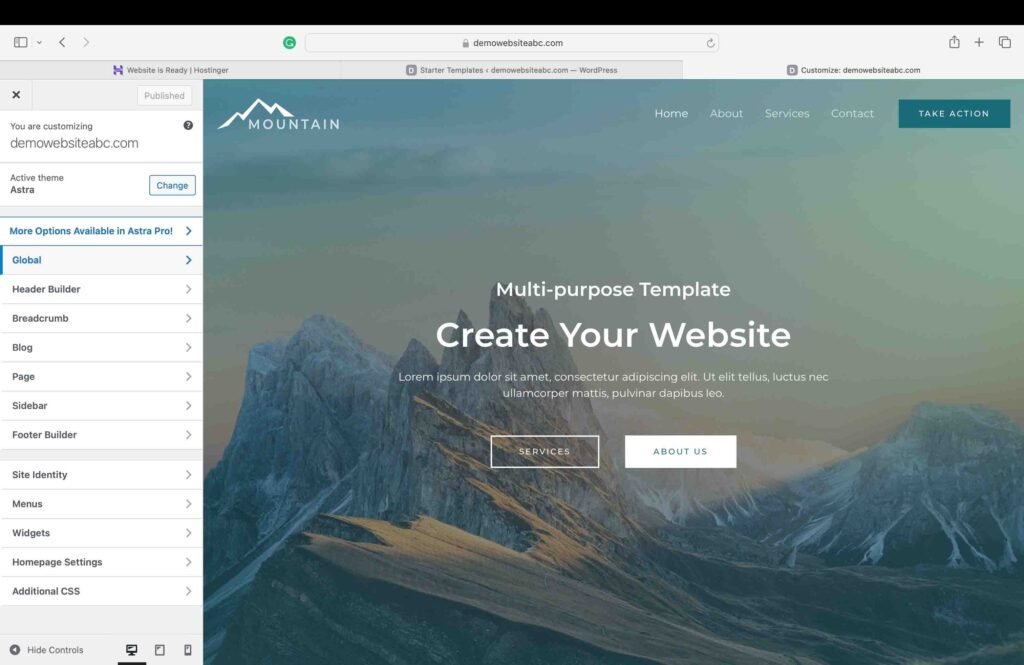
The “Customize” tool lets you customize elements such as headers, footers, default fonts, menus, typography, etc. Furthermore, with the help of this tool, you can also add custom CSS codes. Custom CSS codes are useful for making appearance and layout changes that are not offered by the existing tools.
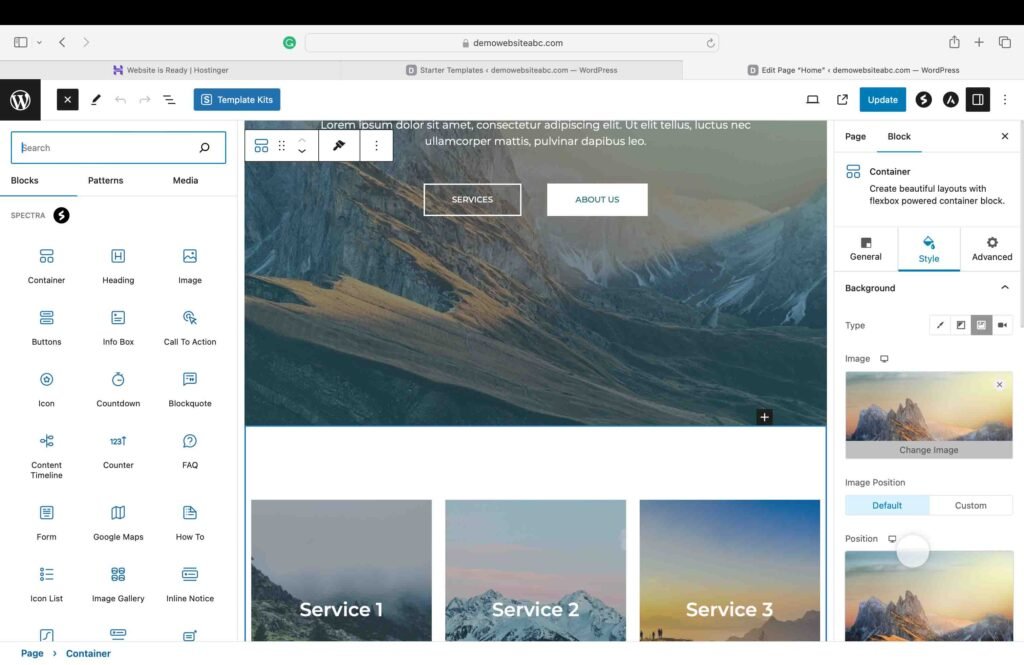
The “Edit Page” tool allows you to edit the contents of a specific page, such as adding a block, deleting a block, changing the background image of a block, etc.
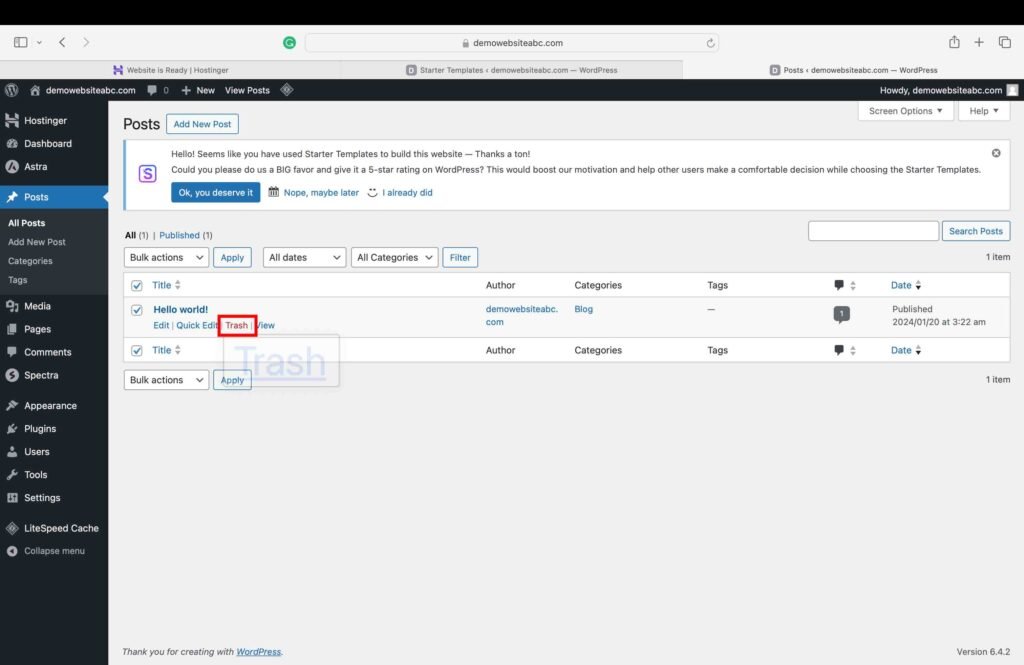
- After you have tailored the home page of your website, go to the post section of the WordPress dashboard and delete the default post.
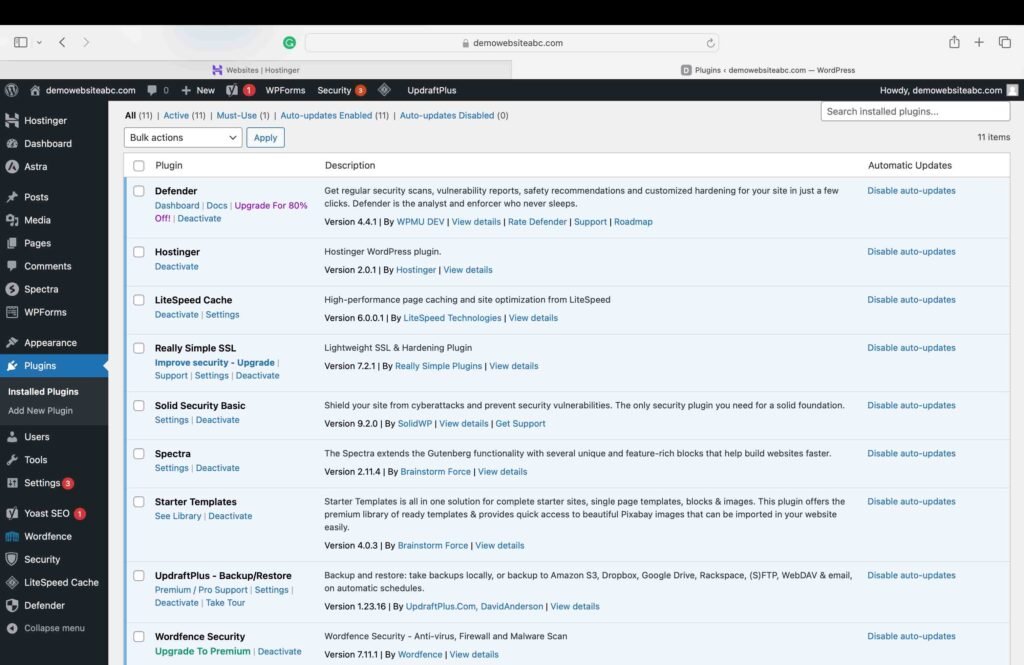
16. Install the Necessary Plugins
Plugins are free or paid software programs that offer security and customization features for your WordPress website. These plugins save a lot of time and money because anyone can install them to meet their security and customization needs without the need to code or hire someone to perform the task. For example, there are security plugins to enhance a website’s security against cyberattacks, hacking, etc. Additionally, there are various plugins that can add contact forms to your WordPress website. There are thousands of plugins out there for various needs. Furthermore, these programs can be installed within the WordPress dashboard at the click of a button. In order to install any plugin, perform the following steps:
- Go to the “Plugins” section.
- Click the “Add New Plugin” button.
- Search for the plugin’s name.
For instance, if you are installing the Yoast SEO plugin, type in the term “Yoast” in the search bar on the “Add Plugins” page.
- Click the “Install Now” button to install the plugin.
- Click the “Activate” button to activate the plugin. Alternatively, you can also activate the plugin on the “Installed Plugins” page.
Recommended Plugins:
- Yoast SEO provides SEO optimization suggestions for your blog posts and pages.
- Wordfence offers security against viruses, hacks, and malware.
- UpdraftPlus offers backups at any desired frequency.
- Really Simple SSL offers enhanced security for your website.
- LiteSpeed Cache offers page caching for enhanced site performance.
- WPForms Lite offers a drag-and-drop form builder to add forms, such as contact forms.
- Enable auto-updates for all plugins to save time spent updating a plugin manually whenever an update is available.
17. Disable Certain Content
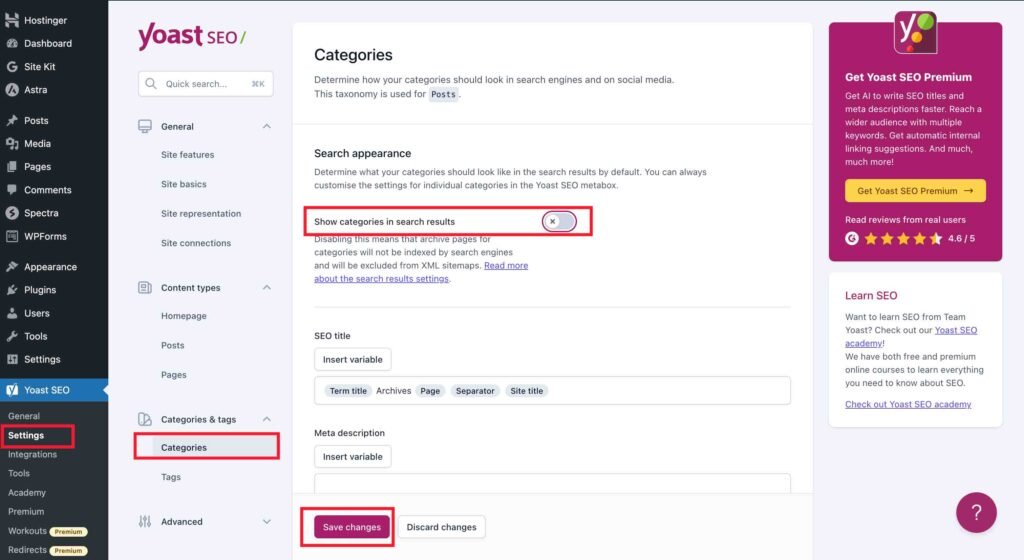
From an SEO perspective, certain content needs to be disabled to avoid thin and duplicate content issues in the Google search results. You can accomplish this with the help of the Yoast SEO settings page.
Categories
Categories are used to classify blog posts and products. For instance, a blog writing articles on website development can publish articles related to hosting, website builders, website design, and so on. In this case, hosting, website builders, and website design are categories. Before a blog post is published, you need to assign a category to it. After a blog post is published, two pages will be created: a blog post page and a category page containing that blog post’s excerpt with the link to the original blog post page itself.
Why Categories should not be indexed?
Generally, a category page contains thin and duplicate content because it usually contains excerpts of original blog posts related to that category. Therefore, if category pages are not critical for your audience, you should disable them so that they are excluded from the Google search results. This prevents spamming the search results with duplicate and thin content. While it is not clear whether these pages have any negative or positive impact on SEO, I would stay away from them so that they don’t become an issue for me in the future. However, these pages can be useful in some cases. For instance, they can be quite useful for an e-commerce website when you want your audience to land on a page that displays similar products in a particular category.
It is worth noting that if you do want to keep these pages indexed for whatever reason, it will require careful strategy and continuous monitoring over time to make sure that they are not competing with the main content pages or negatively impacting your website’s SEO in any way. I found a very insightful article on the WSI Wavery Digital website that clearly explains why category pages should be set to no index. The article is titled Why Tags, Author Archives, and Categories on WordPress Sites Should Be Set to Noindex: An SEO Perspective.
- Toggle off the “Show categories in search results” setting.
Tags
Tags are keywords that are added to a product page or blog post. These tags are used to help website owners with the organization of website content. It also helps website users find relevant information or products in the search results. A WordPress website creates a new page for every tag added to a post. For instance, if you add five tags to a blog post, five additional tag pages will be created in addition to the blog post page. A tag page lists all posts that have used that particular tag.
These tag pages are usually thin in content because they only contain excerpts of blog posts with links to the original blog posts. There is a common misconception about how tags work. These tags are not relevant for the Google search but rather for the internal search on a website. These tags don’t work like “instagram tags.” You should use these tags only if they are necessary for your website. You can gain more insights into this topic in the article “Why you should stop using tags?” on the Yoast website.
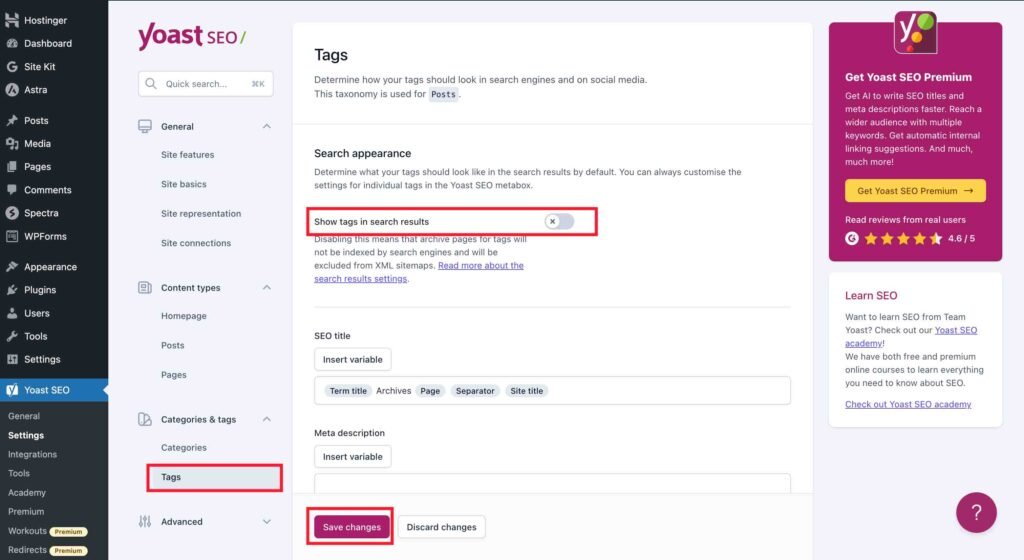
- Toggle off the “Show tags in search results” setting.
Archives and Media Pages
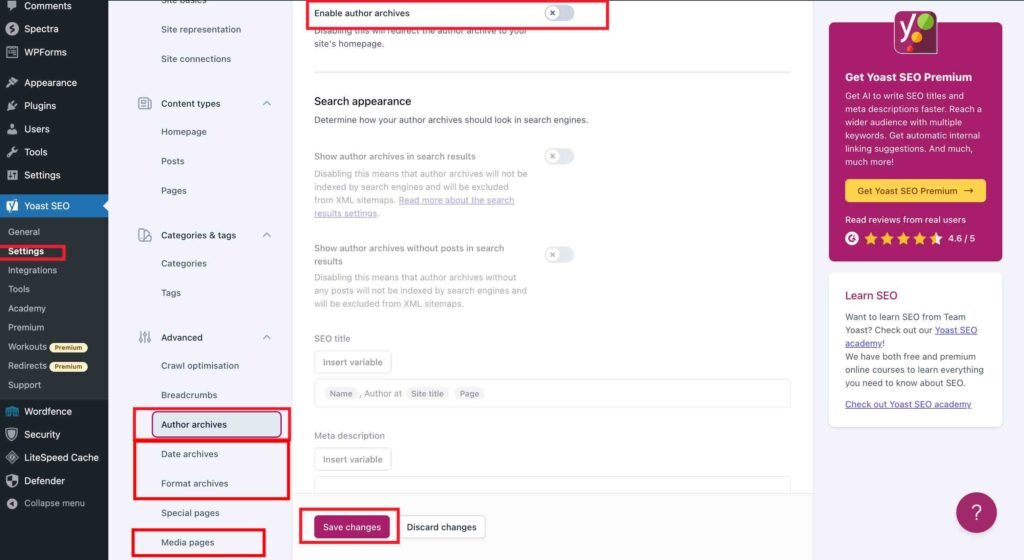
The next step is to disable the following to avoid duplicate and thin content issues in the search results. You can disable them altogether or disable their search appearance.
- Author archives
- Format archives
- Date archives
- Media pages
18. Add, Edit, or Delete Pages
Apart from the home page, a website might need other pages, such as a contact page, a privacy policy page, a terms and conditions page, etc. You can add any number of pages to your WordPress website in the “Pages” section.
- To edit an existing page, click the edit option under the relevant page.
- To delete an existing page, click the trash option under the relevant page.
- To add a new page, click the “Add New Page” button at the top.
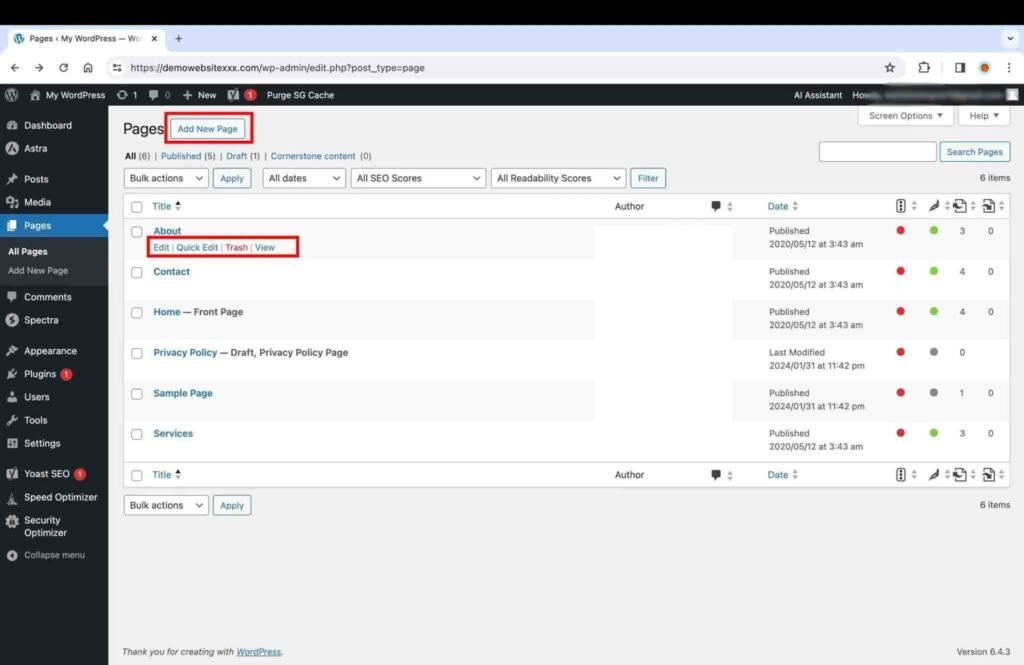
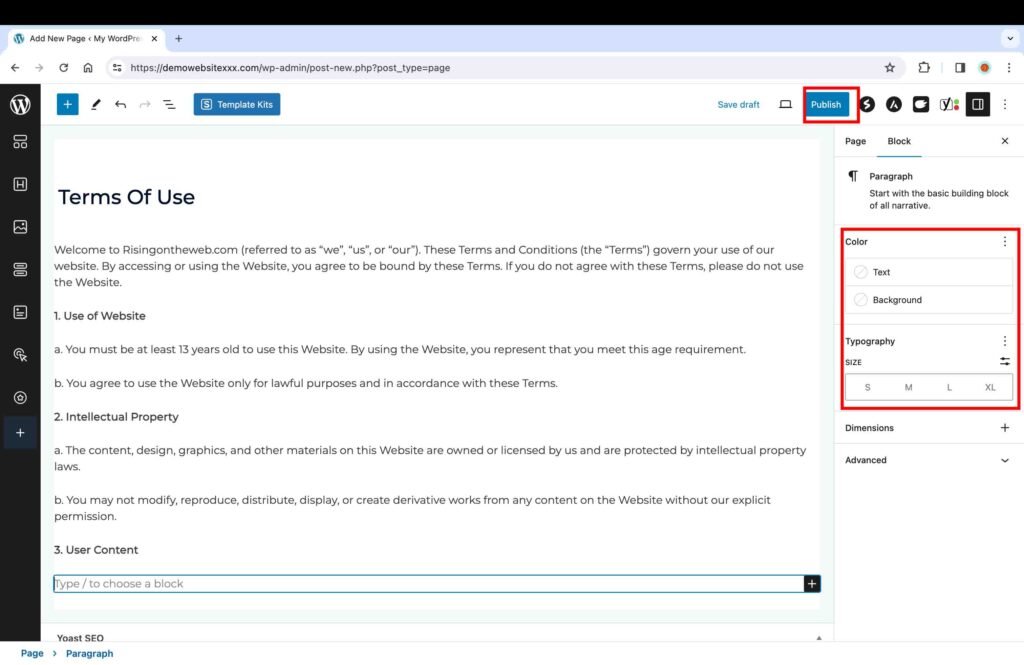
Once you click the “Add New Page” button, you will be directed to the page where you can add the content.
- Format the contents of a page using the “Block” tool dashboard on the right.
- Click the “Publish” button to publish the post.
19. Add and Customize Menus
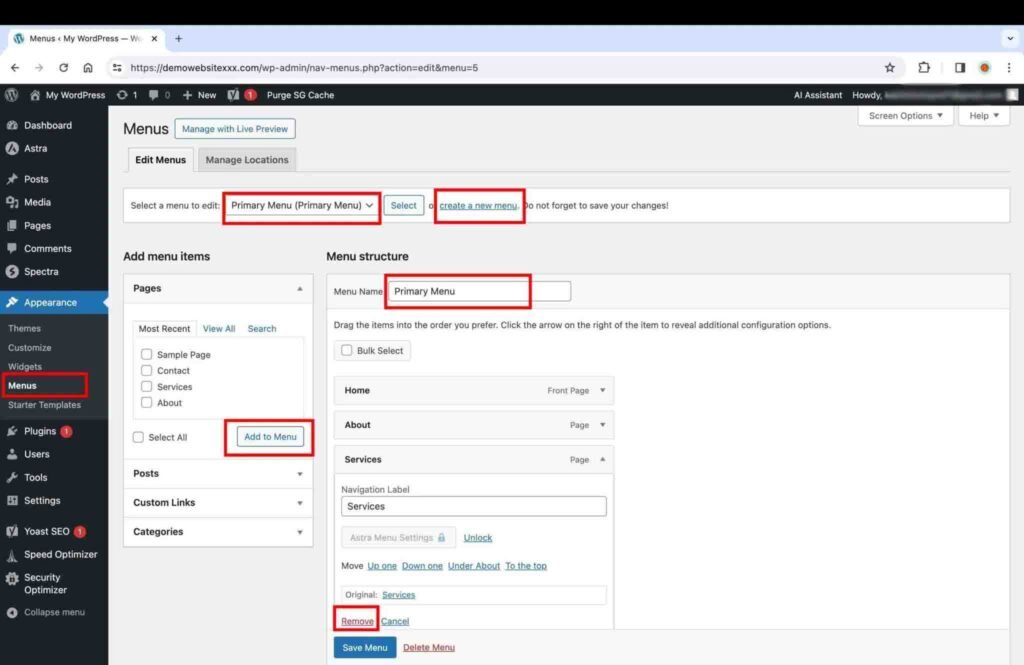
You can also easily customize and create any number of menus for your WordPress website. Usually, a website always needs a header menu and a footer menu. To customize an existing menu or create a new menu:
- Go to the “Menus” page located under the “Appearance” menu item of the dashboard.
Adding a Menu:
- Click the “create a new menu” option at the top of the “Menus” page.
Customizing a Menu:
- Select the menu you want to customize from the drop-down list.
- You can update the name in the “Menu Name” text field.
- To add page(s) to a menu, select the page(s), click the “Add to Menu” button. If the page you are looking to add is not on the list in the “Pages” box, you can always create it in the “Pages” section.
- To remove a page from the menu, click on the page under the menu, then click remove, and hit save.
20. Make the Website Images Responsive
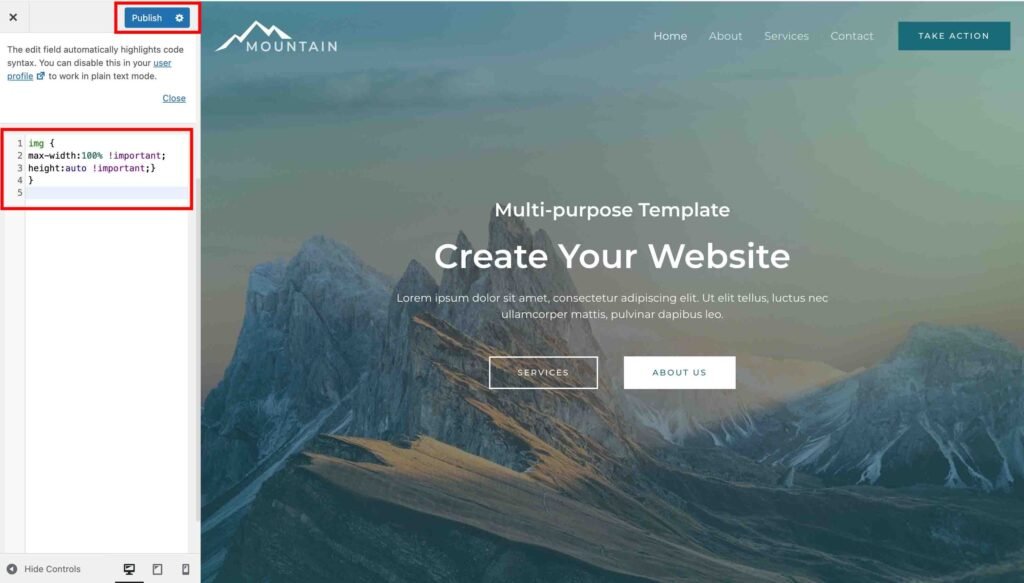
You will need to add custom CSS code to make your website images suitable for viewing on mobile and tablet devices.
- Click the “Customize” button.
- Click the “Additional CSS” button.
- Add the following custom CSS code:
img {
max-width:100% !important;
height:auto !important;}
}
- Click the “Publish” button to save the changes.
21. Check the Website for Different Views
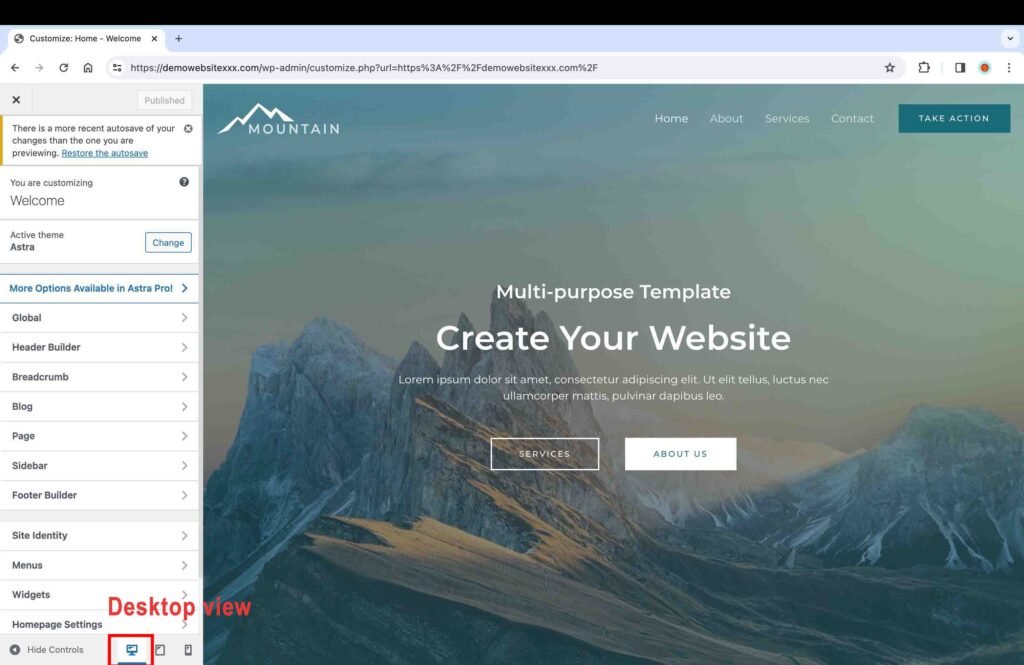
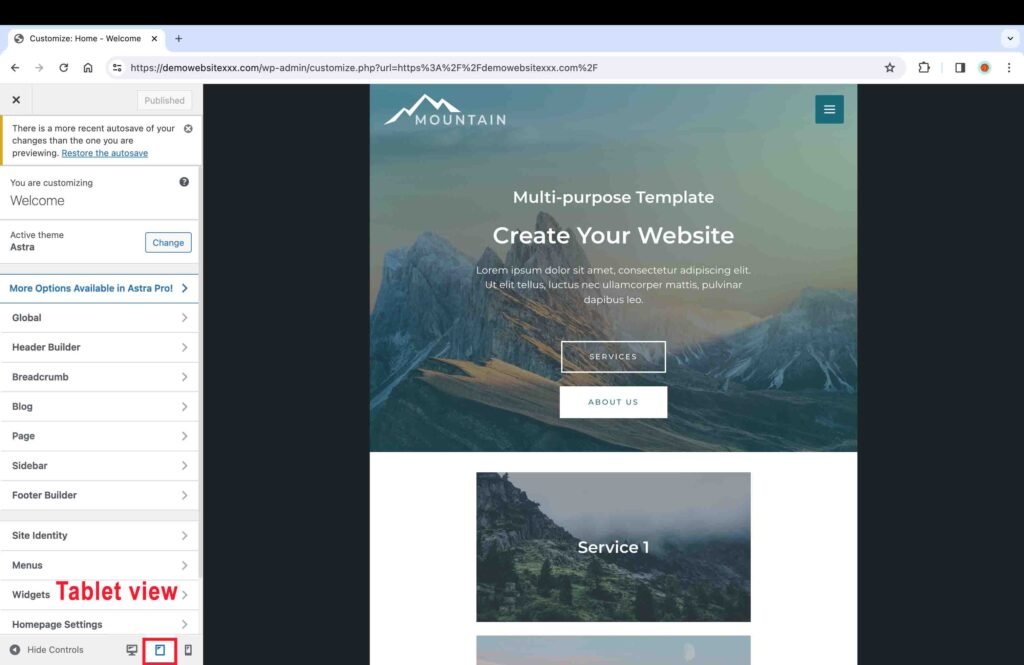
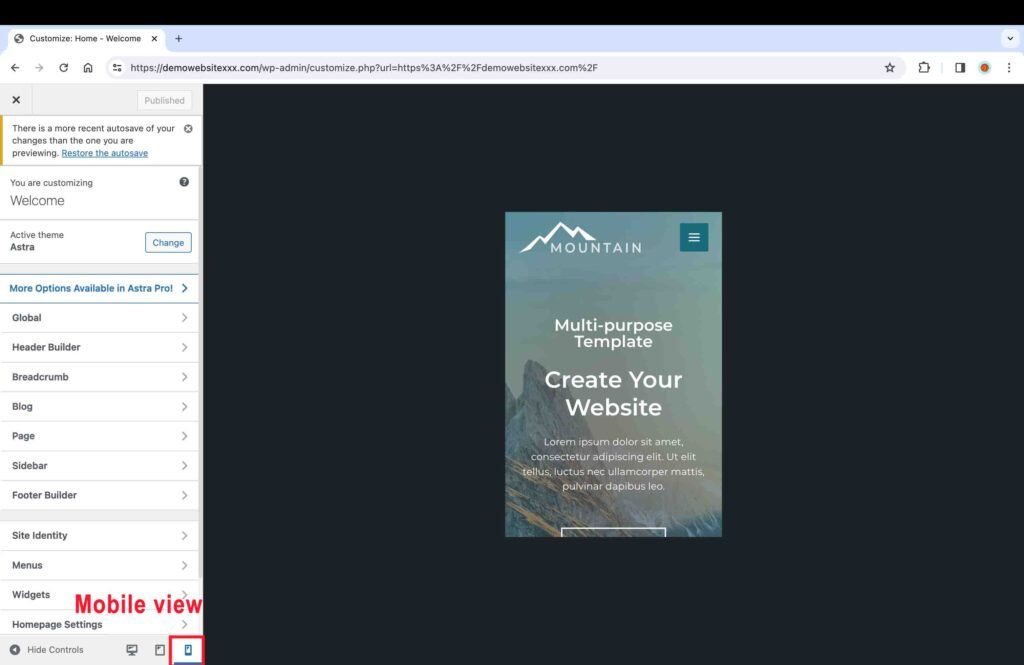
At the bottom of the “Customize” tool bar, there are three icons: desktop, tablet, and mobile.
- Click on each view to make sure that it looks good on all devices. Furthermore, you can also physically check the website on your mobile and tablet devices as well.
21. Add a Blog Post
After you have finished tailoring your website, the next thing is to start publishing content.
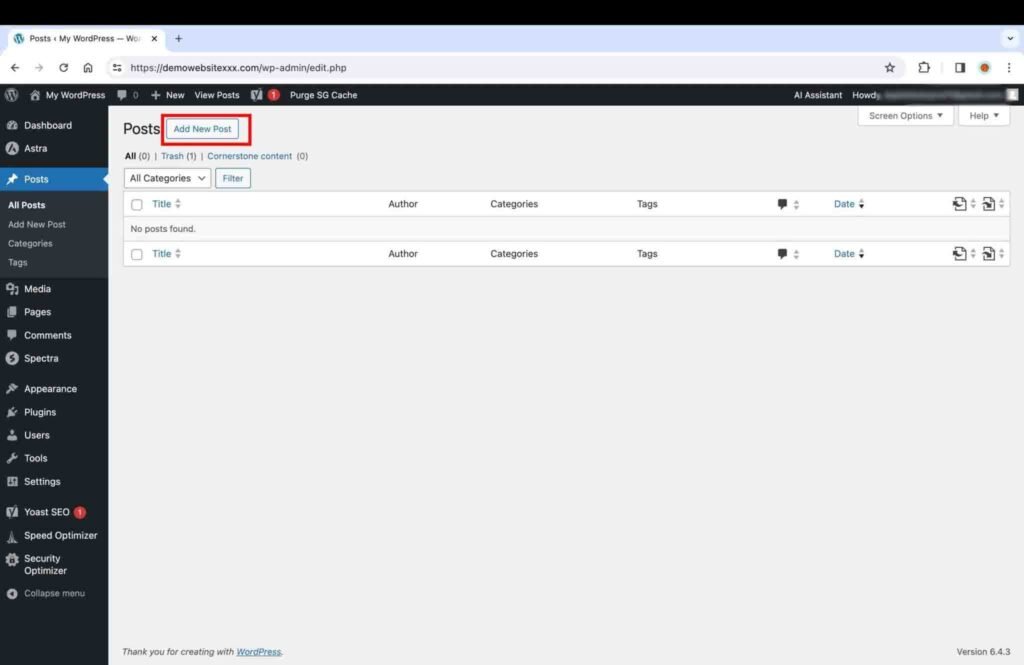
- Go to the “Post” page.
- Click the “Add New Post” button.
- Add the content.
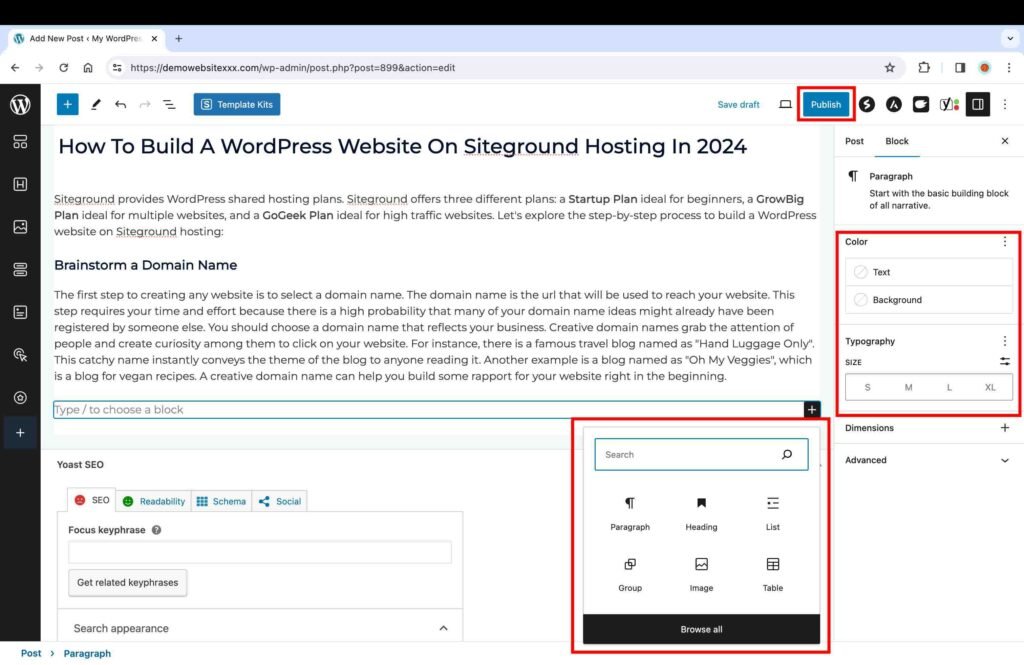
- Use the plus icon to add paragraphs, headings, and a variety of other elements, such as images, videos, tables, etc.
- Format the content using the “Block” toolbar on the right.
- Click on the “Publish” button to publish your blog post.
And you are all set with your new website with Hostinger.